Full-Stack Swift: The Technical Architecture of Technicolor
In my previous post about Technicolor I gave an overview of my hybrid chat app & social network for watching TV shows with friends asynchronously.
Technicolor is a side-project I’ve been iterating on for over a decade (I’ve only used it with small groups of friends). It started its life as a Ruby on Rails app with browser-only support and has now been reborn as a full-stack Swift-on-server web service and native Apple platforms client app.
This post explores the front-end and back-end architectures of Technicolor and some observations about developing its full-stack Swift server and client apps intermittently over several years. The project is not yet open source, but I will share code snippets throughout to illustrate parts of the architecture in context.
TL;DR: Any benefits of full-stack Swift do not meaningfully outweigh its demerits or opportunity costs for any use case I can imagine (happy to change my mind though). But existing Apple platforms developers may enjoy the familiarity of Swift in a new setting and the technical challenge of server-side development in an academic sense.
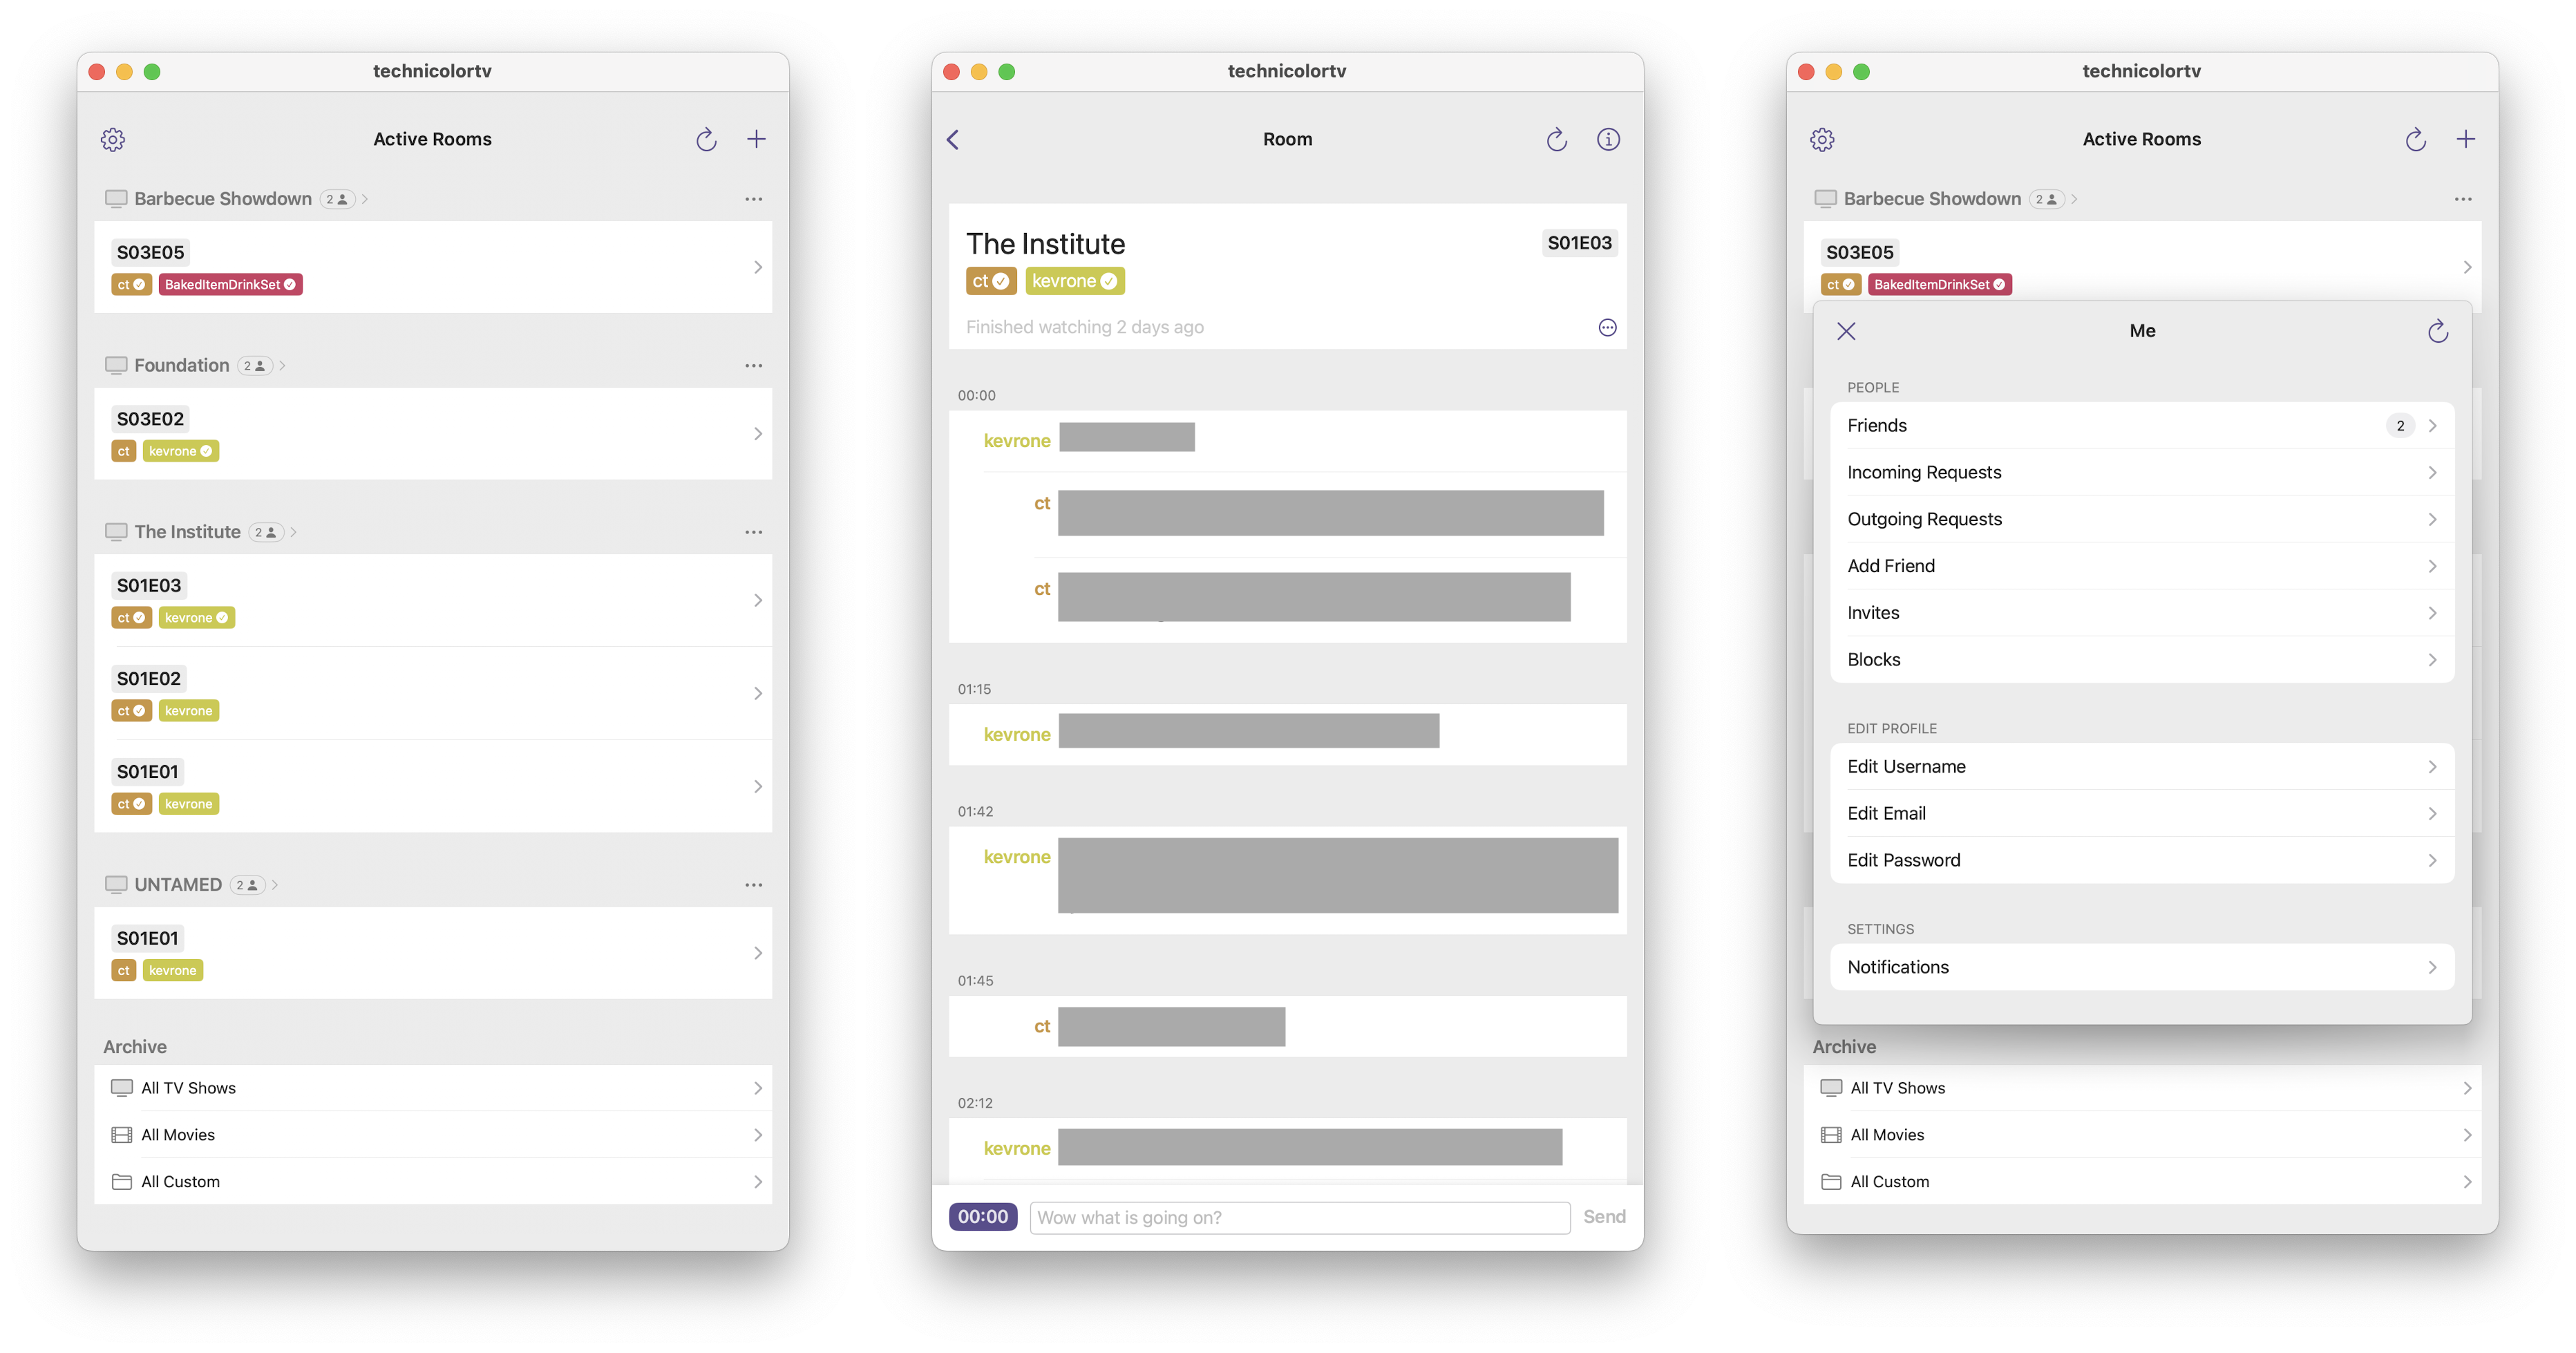
Table of contents
- Architecture overview
- Development experience
- Shared API layer
- Server-side
- Client-side
- Lessons learned
Architecture overview
  ┌─────────────────────┐       ┌──────────────────────────┐
  │  Server (tv-vapor)  │       │  Client (Technicolor)    │
  │                     │       │       iOS/macOS          │
  ├─────────────────────┤       ├──────────────────────────┤
  │ • Swift Vapor       │       │ • SwiftUI + Observation  │
  │ • SQLite + Fluent   │       │ • iOS 17+ / macOS 14+    │
  │ • TMDB API Client   │       │ • Mac Catalyst Support   │
  │ • Push Notifications│       │                          │
  │ • Deployed on Fly.io│       │                          │
  └─────────────────────┘       └──────────────────────────┘
                  │                           │
                  └─────────────┬─────────────┘
                                │
                                ▼
                  ┌─────────────────────────────┐
                  │    Shared API Layer         │
                  │       tv-models             │
                  ├─────────────────────────────┤
                  │ • 164 Codable Structures    │
                  │ • Type-Safe Client/Server   │
                  │ • Input/Output DTOs         │
                  └─────────────────────────────┘
Technicolor has a client-server architecture. The server vends json data via HTTP requests to clients authenticated with a bearer token.
The server is written in Swift using the Vapor web framework. The primary database is SQLite via the Fluent sub-framework. It fetches metadata about TV shows and movies from the TMDB API and caches the data in SQLite. It’s deployed to a single Machine on PaaS Fly.io.
The client is written in Swift and SwiftUI and supports iOS and macOS (via Mac Catalyst or Designed for iPad) with one codebase and two targets.
There is a Swift package called tv-models, imported by both the client and server, that contains the Codable models that form the shared API layer. This shared API layer was the primary motivator for using Swift everywhere.
The entire project is contained in a Git mono-repo. The sources for the server side, client side, and shared models live in their own individual directories within the project directory. Most configuration files like the Dockerfile live in the project directory.
I’ll explore the development experience, shared API layer, server-side, and client-side aspects in more detail.
Development experience
The blessing and curse of using full stack Swift is that I can use Xcode for everything. The cons of course are that Xcode can be bloated and buggy. But the pros are that I can explore, develop, and debug the entire codebase in one IDE that’s fine-tuned for Swift.
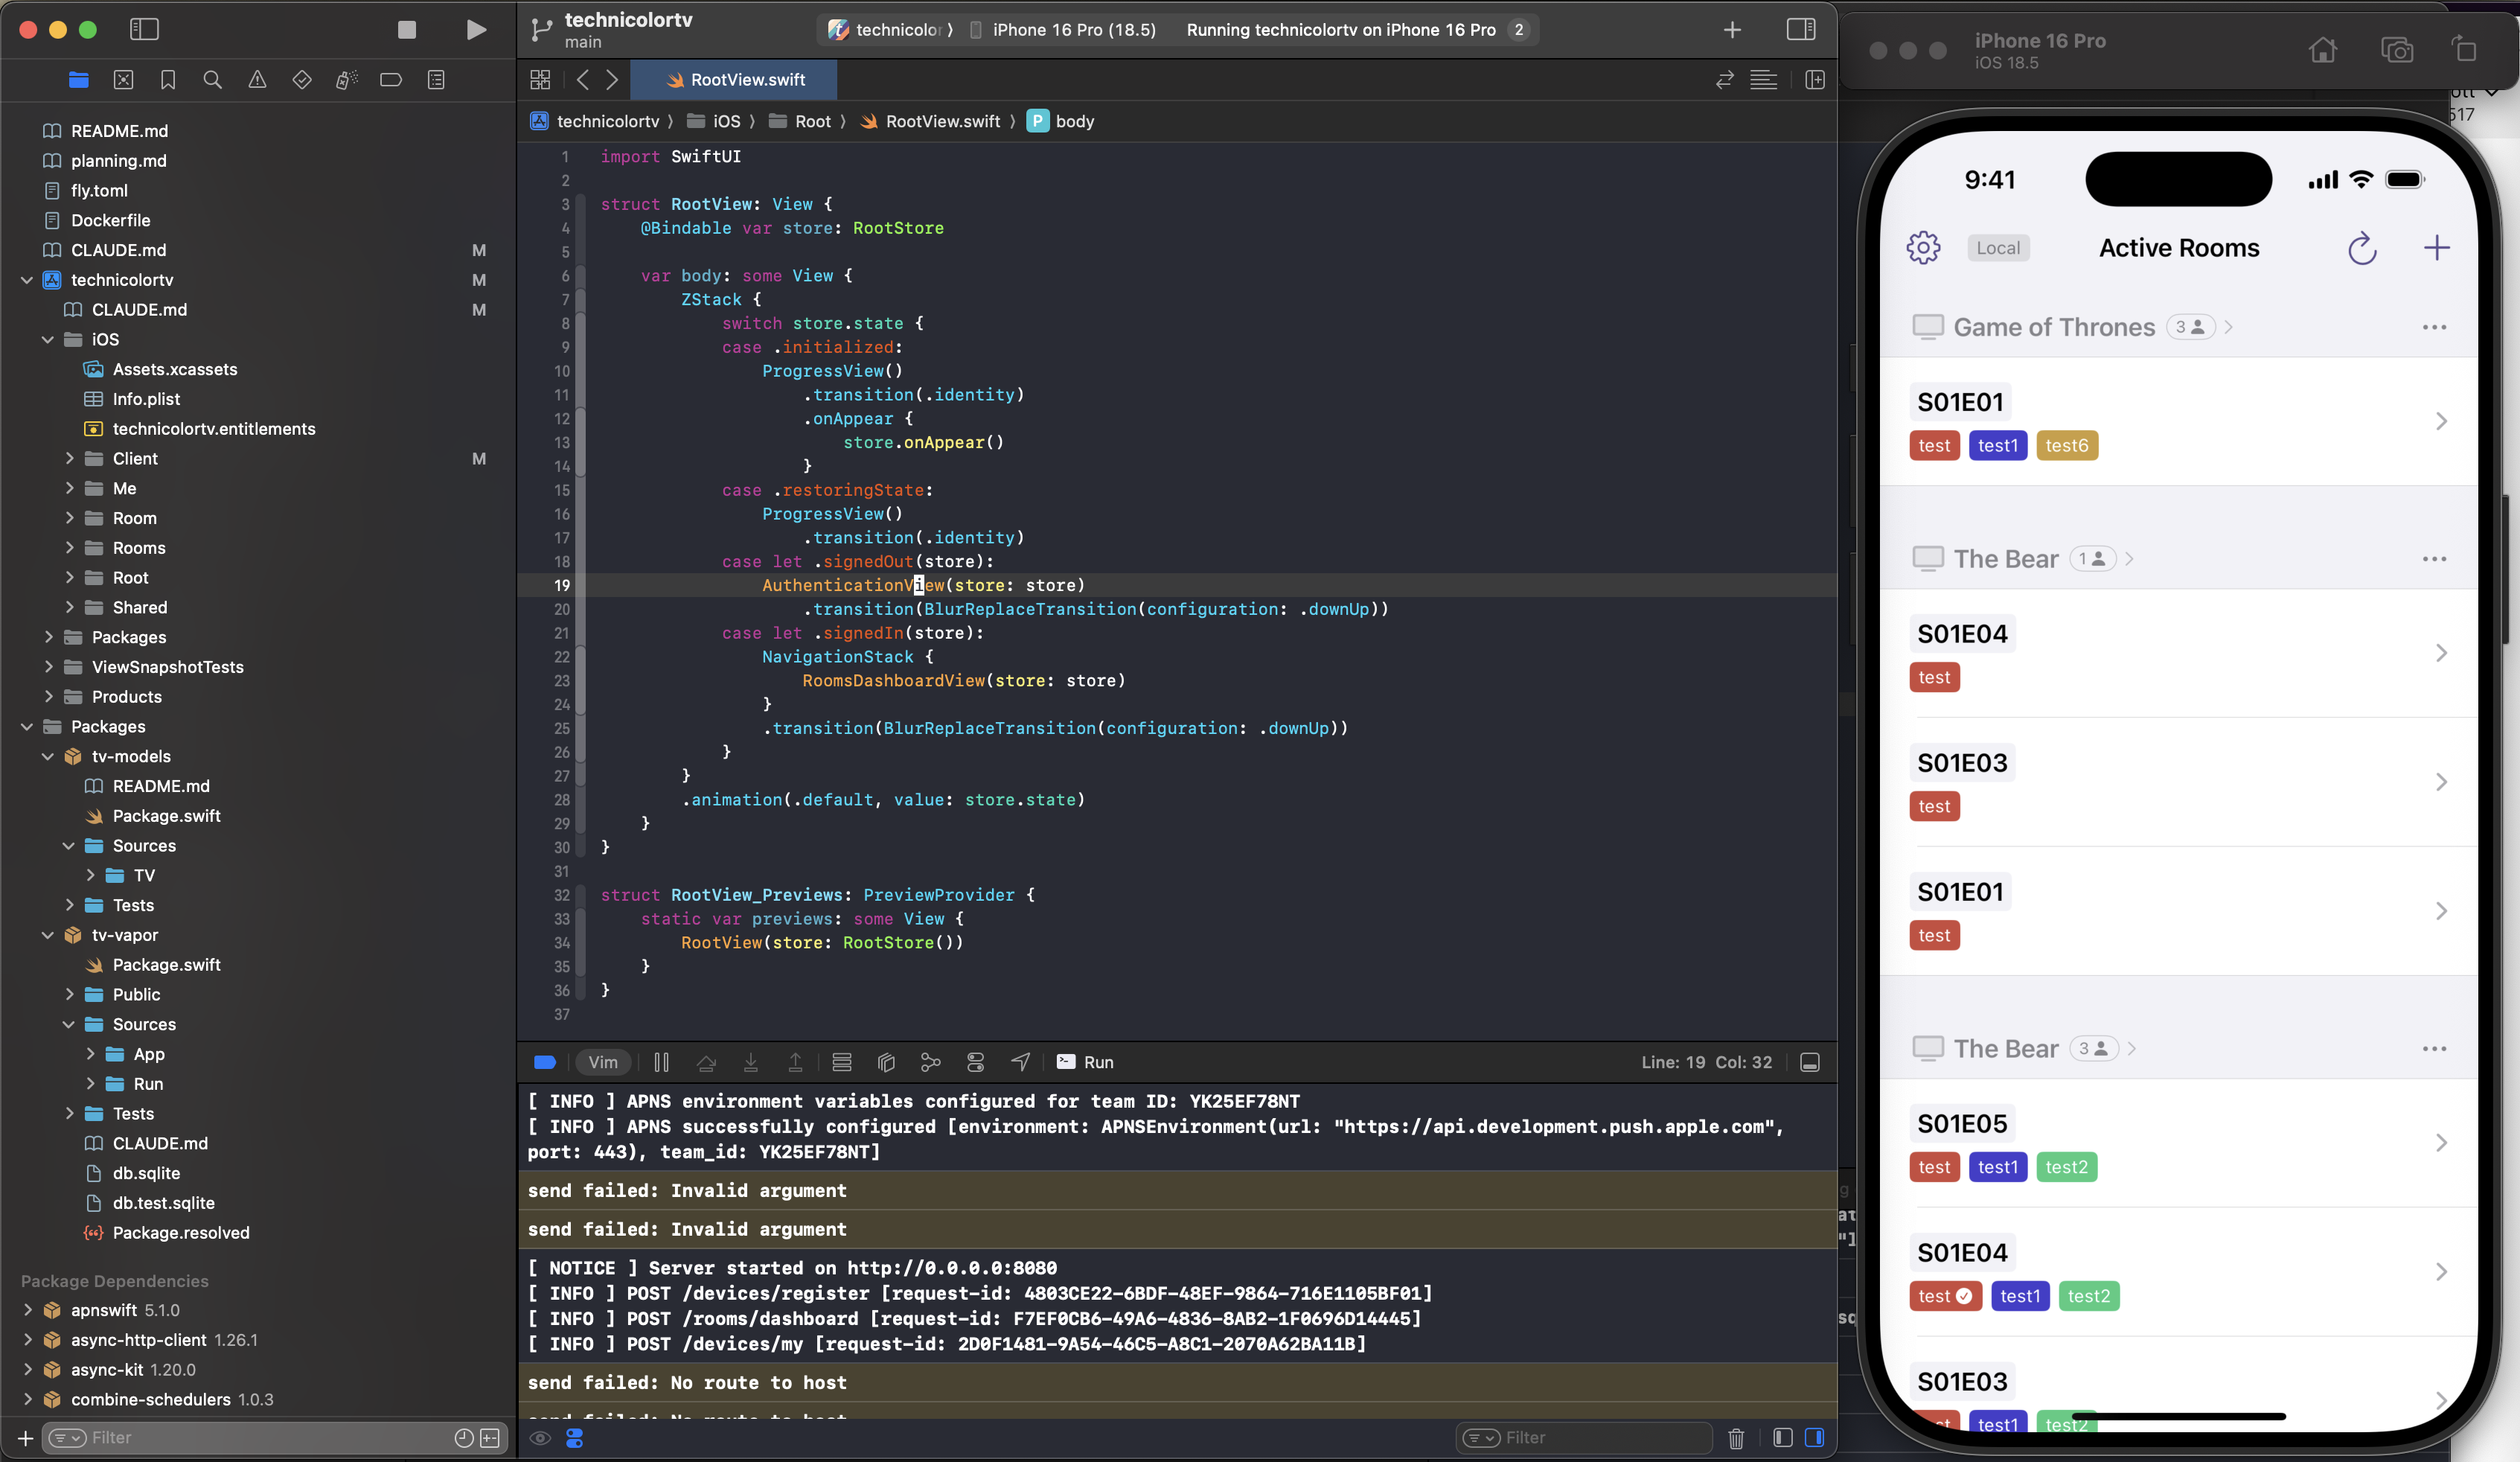
The specific setup within Xcode is a single xcworkspace file that contains:
- An XcodeGen generated
xcodeprojfile for the iOS/macOS clients. - A Swift package for the
tv-modelsshared DTO models. - A Swift package for the server-side Vapor project.
Overall, the xcworkspace-based setup worked okay. There were a few times where Swift Package caching needed manual fixing (several wasted hours I won’t be getting back). I’ve also wrestled with an issue where Swift Packages can force-create schemes in the workspace that cannot be ignored.
I have separate schemes for running the server and client, using separate destinations for running the iOS and macOS clients. Both the server and client are debuggable with all of Xcode’s integrated LLDB support including breakpoints. The console shows logs from server and client.

It’s certainly powerful to be able to set a breakpoint in a server endpoint handler and the client view model and step through the request and response cycle from both sides.
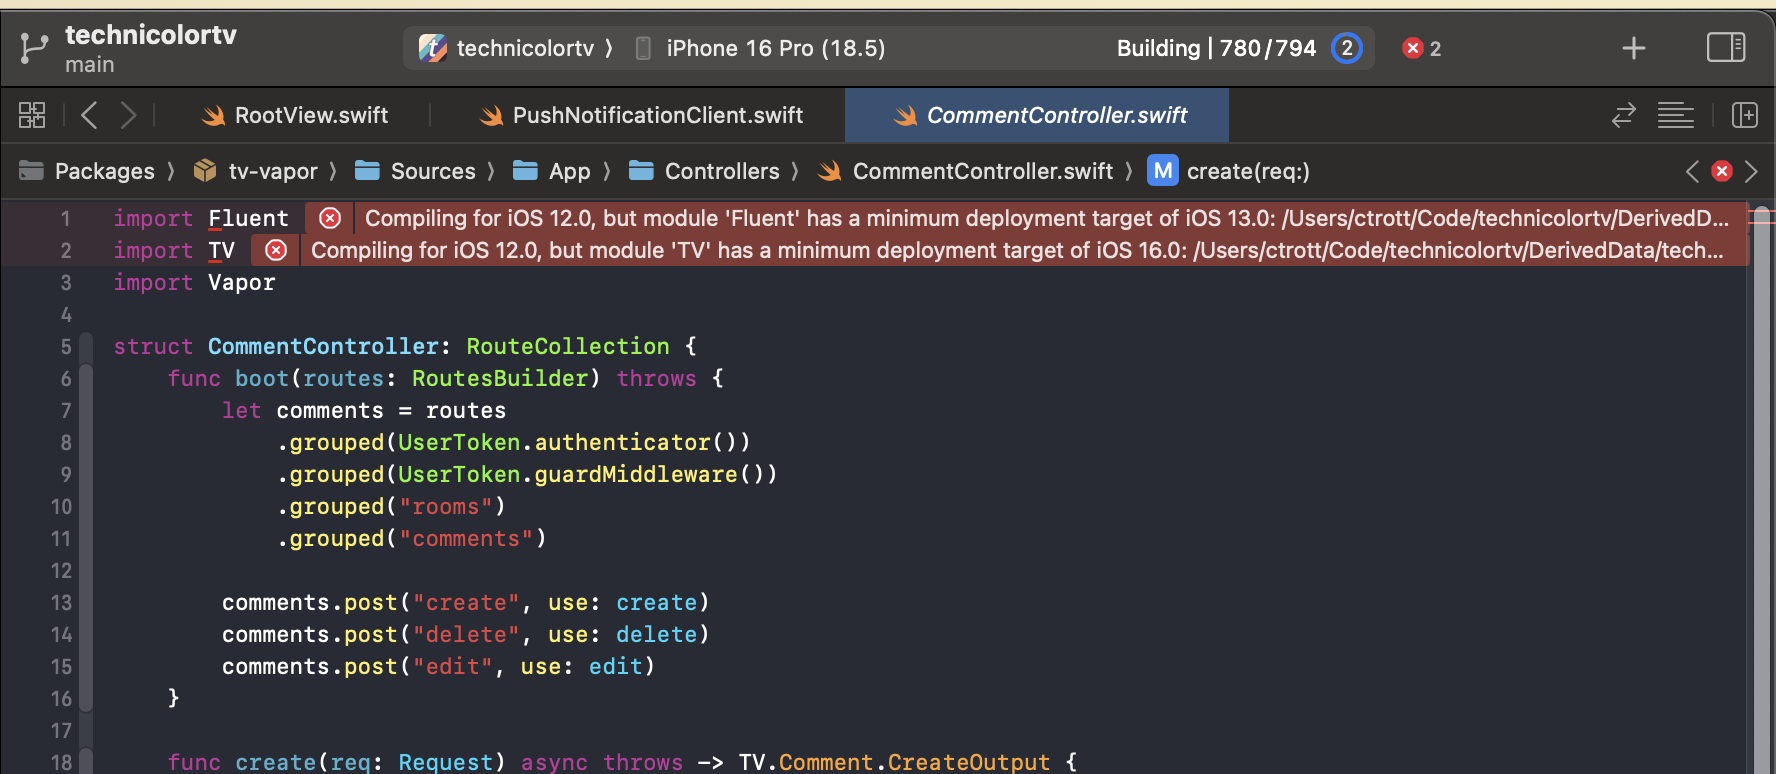
Xcode only pre-builds the active target. For example, if I make a change to the shared tv-models layer while the client target is active, Xcode won’t show me I’ve introduced a compiler error on the server until I switch to the server target and build it. Similarly, if a server source file is visible in the editor window while the client target is active, Xcode will often show a bunch of false-positive errors inline that you need to remember to ignore.
It’s still possible to build and run and test the server from outside Xcode, and I did often during this most recent development cycle with Claude Code. Adding coding agents made the all-in-one Xcode integration experience less impactful than it was a couple years ago.
I use SwiftFormat and a .swiftformat rules file in the project directory to maintain formatting across all Swift source files.
My overall takeaway is that the many of the benefits of server-client development inside Xcode don’t outweigh the demerits of the server-side Swift ecosystem’s relative immaturity. It’s a lonely experience using Xcode as the IDE of choice for server-side development, even if the backend is Swift.
Shared API layer
The tv-model Swift package contains the handful of Codable struct definitions used by each Controller on the server side and the APIClient on the client side. These are often referred to as data transfer objects or DTOs.
This essentially enforces a type-safe client-server API. The caveat of course is that model structs and fields are add-only and higher-level API versioning rules apply.
An example of some shared Comment-related models from tv-models:
public enum Comment {
    struct CreateInput: Equatable, Codable, Sendable {
        public let roomID: UUID
        public let content: String
        public let seconds: Int

        public init(roomID: UUID, content: String, seconds: Int) { */ ... */ }
    }

    struct CreateOutput: Equatable, Codable, Sendable {
        public let roomID: UUID
        public let comment: Full

        public init(roomID: UUID, comment: Full) { */ ... */ }
    }

    struct Full: Equatable, Codable, Sendable {
        public let id: UUID
        public let createdAt: Date
        public let updatedAt: Date
        public let content: String
        public let seconds: Int
        public let user: User.Stub

        public init(id: UUID, createdAt: Date, updatedAt: Date, content: String, seconds: Int, user: User.Stub) { */ ... */ }
    }
}
For the API endpoint envelope models, my convention is using Create, Edit, Delete, Show, etc. prefixes and Input or Output with respect to the server. In other words, the client creates Input models and receives Output models.
I use Full for models that contain the majority of the database model’s data. I use Stub for smaller subsets. It’s generally worked out well to keep the amount of model sub-types low while having the flexibility to create new ones when it makes sense. It simplifies the client side, allowing model types to be passed between sub-systems (unlike GraphQL which has unique model-types per request).
On the client-side, these models are mostly used as-is throughout the codebase, even in the View layer.
On the server-side, Fluent ORM has its own class-based model definitions that are used to interact with the source-of-truth database data. There is a custom encoding/decoding layer for each DTO.
/// Fluent ORM model
final class Comment: Model, @unchecked Sendable {
    static let schema = "comments"

    @ID(key: .id)
    var id: UUID?

    @Timestamp(key: "created_at", on: .create)
    var createdAt: Date?

    @Timestamp(key: "updated_at", on: .update)
    var updatedAt: Date?

    @Field(key: "content")
    var content: String

    @Field(key: "seconds")
    var seconds: Int

    @Parent(key: "user_id")
    var user: User

    @Parent(key: "room_id")
    var room: Room

    init() {}
}

/// Converting a Fluent model to a DTO
extension TV.Comment.Full {
    init(_ comment: Comment) throws {
        guard let createdAt = comment.createdAt,
              let updatedAt = comment.updatedAt
        else {
            throw Abort(.internalServerError)
        }

        try self.init(
            id: comment.requireID(),
            createdAt: createdAt,
            updatedAt: updatedAt,
            content: comment.content,
            seconds: comment.seconds,
            user: TV.User.Stub(comment.user)
        )
    }
}
Although the model definitions are shared and type-safe, the endpoint URLs themselves are duplicated across client and server. There is probably a way I could share these as well, but at the moment I haven’t found this to be enough of a maintenance burden or source of bugs that I need to spend time trying to harmonize it.
My takeaway is that this setup is definitely convenient, but the more popular web frameworks have solved this problem in other ways like using OpenAPI and its code generators. Technicolor has some complexity (164 model structures), but nowhere near that of a large scale SaaS or social network.
Server-side
Technicolor began its life back in 2013 as a Ruby on Rails app with a web client. In 2017 I made a brief foray into rewriting the backend in the Elixir language with the Phoenix web framework, but quickly abandoned that effort when Swift Vapor began gaining some popularity.
Thoughts on the Swift Vapor framework
When I first began development on the Technicolor rewrite, Vapor was still using the EventLoopFuture concurrency primitives from SwiftNIO. EventLoopFuture felt similar to a FRP framework like Combine or RxSwift. But in comparison to async await, it was really painful. Swift’s type inference is awful with the amount of mapping closures required for EventLoopFuture. In these early stages, even simple endpoints took hours to write and test. Compare the EventLoopFuture version of the Comment create func here to the async version in the next section:
func create(req: Request) throws -> EventLoopFuture<TV.EmptyOutput> {
    let userID = try req.auth.require(UserToken.self).user.requireID()
    let input = try req.content.decode(TV.Comment.CreateInput.self)
    let comment = Comment(content: input.content, seconds: input.seconds, userID: userID, roomID: input.roomID)
    return RoomUser.query(on: req.db)
        .filter(\.$room.$id == input.roomID)
        .filter(\.$user.$id == userID)
        .first()
        .unwrap(or: Abort(.unauthorized))
        .flatMap { _ in comment.create(on: req.db) }
        .flatMapThrowing { try comment.requireID() }
        .flatMap { newCommentID in
            Comment.query(on: req.db)
                .with(\.$user)
                .filter(\.$id == newCommentID)
                .first()
                .unwrap(or: Abort(.internalServerError))
        }
        .flatMapThrowing { newComment -> EventLoopFuture<TV.Comment.Room> in
            let fullComment = try TV.Comment.Full(newComment)
            let roomComment = TV.Comment.Room(roomID: input.roomID, comment: fullComment)
            return RoomUser.query(on: req.db)
                .with(\.$user)
                .field(\.$user.$id)
                .filter(\.$room.$id == input.roomID)
                .all()
                .flatMapThrowing { roomUsers -> TV.Comment.Room in
                    let userIDs = roomUsers.compactMap(\.user.id)
                    try req.webSocketClient.send(message: .comment(roomComment), to: userIDs)
                    return roomComment
                }
        }
        .transform(to: TV.EmptyOutput())
}
As Swift Concurrency matured, the Vapor team finished their early work on supporting async/await alongside EventLoopFuture. I spent days tediously rewriting the existing EventLoopFuture signal chains. The async versions looked a lot better, but it was hard won.
Coming back to the project after a couple years, the Vapor team seems to be stalled in finishing up Swift Strict Concurrency support. Fluent models must still be declared @unchecked Sendable. I’m running Swift 6.0 on the deployment, but with Swift 5 language mode.
I don’t want to discount the laudable work done by the Vapor core team and community. But going up against the mature frameworks from JS, Ruby, Python, PHP, etc., dealing with the low prioritization of Swift on the server from Apple, and with the overall churn of the Swift language, my take is that using Vapor is the wrong choice if your aim is pragmatism.
However, like I’ve mentioned so far, there are upsides to using Swift on the server. In theory it’s faster than interpreted languages and the type safety makes refactors safer and obviates the need for massive test suites.
Routes and Controllers
Here is a taste of what it looks like to define the Comment-related routes.
struct CommentController: RouteCollection {
    func boot(routes: RoutesBuilder) throws {
        let comments = routes
            .grouped(UserToken.authenticator())
            .grouped(UserToken.guardMiddleware())
            .grouped("rooms")
            .grouped("comments")

        comments.post("create", use: create)
        comments.post("delete", use: delete)
        comments.post("edit", use: edit)
    }

    // ...
}
This generates 3 POST routes that use middleware to parse out a valid auth token and make it available to the request:
/rooms/comments/create
/rooms/comments/delete
/rooms/comments/edit
My unique convention is to use POST for all requests, even read-only CRUD operations like show that would usually be GET. The reasoning behind this is that it allows me to use the same JSON-encoded HTTP body plumbing for all requests instead of having to selectively encode and decode either or both from the URL query and the HTTP body.
The actual request/response implementation on the server side (modern async version) looks something like this:
// CommentController.swift
func create(req: Request) async throws -> TV.Comment.CreateOutput {
    let userID = try req.auth.require(UserToken.self).user.requireID()
    let input = try req.content.decode(TV.Comment.CreateInput.self)

    // Ensure the User is allowed to post Comments in this Room
    _ = try await RoomUser.query(on: req.db)
        .filter(\.$room.$id == input.roomID)
        .filter(\.$user.$id == userID)
        .first() ?! Abort(.unauthorized)

    // Prefer using timestamp from content string if it exists
    let (finalContent, finalSeconds): (String, Int)
    if let parsed = TimestampParser.parseTimestampFromContent(input.content), let parsedSeconds = parsed.seconds {
        finalContent = parsed.parsedContent
        finalSeconds = parsedSeconds
    } else {
        finalContent = input.content
        finalSeconds = input.seconds
    }

    // Create the comment in the database
    let comment = Comment(content: finalContent, seconds: finalSeconds, userID: userID, roomID: input.roomID)
    try await comment.create(on: req.db)

    // Prepare all data needed to populate the DTO
    let newCommentID = try comment.requireID()
    let newComment = try await Comment.query(on: req.db)
        .with(\.$user)
        .filter(\.$id == newCommentID)
        .first() ?! Abort(.internalServerError)

    let fullComment = try TV.Comment.Full(newComment)
    let output = TV.Comment.CreateOutput(roomID: input.roomID, comment: fullComment)
    return output
}
For most CRUD operations, the endpoint implementation is pretty straightforward: parse inputs, specific model authorization, fetch some data, modify and write some data back to the database, convert data to a DTO and return. So much so that coding agents have a pretty easy time interpreting a specification to add or modify existing endpoints.
Authentication
Early on in the project, I decided to roll my own email-identity, bearer token authentication using the primitives provided by Vapor. The reasoning was to keep things simple while getting a better understanding of what goes on behind the scenes as (primarily) a client-side developer. Although I haven’t touched this code in years, I still think I have a better understanding of auth frameworks than I did before giving it a go.
As a quick summary, all requests to Technicolor use bearer token authorization with the exception of:
- Create Account: uses no authentication, but checks against an invite token in the request data to ensure the new user is allowed to create an account.
- Log In: uses HTTP Basic authentication.
Services
A critical decision I made early on that affects the architecture of the server codebase: I’m deploying to a single server with direct access to the SQLite database. As I discussed in Configuring Swift Vapor on Fly.io with SQLite, there are several tradeoffs to this decision with the primary benefit being simplicity.
This decision works in concert with defining and using services in Controllers (request handlers). State within services can be shared between requests if necessary (using proper locking for thread safety) without the additional complexity of worrying about sharing that data across parallel app servers.
For example, this is how I define and use the client that fetches data from TMDB.
extension Application {
    private struct TMDBClientKey: StorageKey {
        typealias Value = TMDBClient
    }

    var tmdbClient: TMDBClient {
        get {
            storage[TMDBClientKey.self]!
        }
        set {
            storage[TMDBClientKey.self] = newValue
        }
    }
}

public func configure(_ app: Application) async throws {
    // ...

    let tmdbApiKey = Environment.get("TMDB_API_KEY") ?? ""
    let tmdbClient = TMDBClient(httpClient: app.http.client.shared, apiKey: tmdbApiKey, logger: app.logger)
    app.tmdbClient = tmdbClient

    try await routes(app)
}

final class TMDBController: RouteCollection {
    // ...

    func search(req: Request) async throws -> TV.TMDBPagedResponse<TV.TMDBMultiSearchResult> {
        let input = try req.content.decode(TV.TMDBSearchInput.self)

        guard !input.query.isEmpty else {
            throw Abort(.badRequest, reason: "Query is required")
        }

        let page = input.page ?? 1
        let tmdbClient = req.application.tmdbClient
        let mediaTypeEnum = input.mediaType

        return try await tmdbClient.search(query: input.query, mediaType: mediaTypeEnum, page: page)
    }
}
Testing
I have a db migration that sets up a very minimal set of test users with hard coded token values to make local development easier.
In the early stages of the project, I maintained a Paw file (now RapidAPI) to facilitate manual testing of server endpoints.
In this latest sprint, I’ve developed a full Swift Testing test suite with ~150 tests. Especially when endpoints only depend on the local database, the request/response cycle is a lot more straightforward to write automated tests for than what I’m used to on the iOS side.
The addition of the external TMDB client and caching has made some endpoints a little tricker to test, but overall I feel confident that my test suite is providing value.
As a quick example, all tests follow the below pattern pretty closely. Over time, I’ve built up a lot of helpers to keep the tests focused, consistent, and easy to read and write.
@Suite("CommentController Tests")
struct CommentControllerTests {

    @Suite("Comment Creation")
    struct CommentCreationTests {

        @Test("Create comment with valid input succeeds")
        func createCommentSuccess() async throws {
            try await withApp(configure: configureTestApp) { app in
                try await withAuthenticatedUser(on: app) { user, userToken in
                    // Create a room and add user to it
                    let room = try await createTestRoom(on: app.db, withUsers: [user])

                    let createInput = try TV.Comment.CreateInput(
                        roomID: room.requireID(),
                        content: "This is a test comment",
                        seconds: 120
                    )

                    try await app.testing().authenticatedRequest(.POST, "/rooms/comments/create", token: userToken, beforeRequest: { req in
                        try req.content.encode(createInput)
                    }) { res async throws in
                        #expect(res.status == .ok)

                        try assertDecodable(res, as: TV.Comment.CreateOutput.self) { response in
                            #expect(response.comment.content == "This is a test comment")
                            #expect(response.comment.seconds == 120)
                            #expect(response.comment.user.username == user.username)
                            let roomID = try room.requireID()
                            #expect(response.roomID == roomID)
                        }
                    }
                }
            }
        }
    }
}
All 163 tests run in parallel with a separate copy of the migrated test database and complete on my MacBook Pro in about 12 seconds.
Deployment
I wrote a detailed post about my exact deployment setup, but here I’ll reiterate that I’ve found deployment to be difficult and often an awful time sink. I’d consider setting deployment up from the beginning of Vapor app development and updating periodically as your app grows in complexity.
Although a default Dockerfile is included in the Vapor new project generation, it can be inscrutable to devops novices like myself. I had particular trouble with ensuring the tv-vapor shared models source directory was available as a sibling directory in the development repo, but as a subfolder in the Docker image. It was a lot of slow trial and error.
As great as the Dockerfile is as a generic recipe for deployment, there are always going to be specifics you need to learn about your actual deployment destination. For me, I’ve kept using Fly.io for whatever reason, but I think any PaaS or VPS is going to have the same learning curve. Fly.io had the same kind of configuration churn I experienced with Swift and Vapor for a side project with years-long breaks in the development cycle.
One particular gotcha I ran into a few times is accidentally using Swift APIs that are unavailable on Linux. The open source Foundation has mostly hit feature parity, but there are some sibling frameworks like CryptoKit that require using an open source variant. These were cases that I would unfortunately discover when deploying a new build to Fly.io and it failing with some cryptic error message.
At the moment I’m YOLO-deploying to the production server after developing on localhost. Before exiting beta I’ll also create a development server.
Client-side
Supported platforms
When I first started working on the client side apps several ago, the promise of SwiftUI’s initial pitch of learn-once, apply anywhere was still optimistic for many of us. I built out the initial structure of the apps under the presumption of high SwiftUI compatibility across iPhone, iPad, and macOS. There were lots of SwiftUI modifier shims, and I made sure to aggressively modularize Views so they could be composed uniquely between platforms.
Unfortunately, after the first couple sprints I found myself bogged down in a lot of missing and broken APIs, especially on the macOS side. I eventually gave up on native macOS support and switched over to Mac Catalyst. In my most recent sprints, I realized that Designed for iPad actually looks and functions better than Mac Catalyst, while also requiring nearly zero API conditionals between the two platforms. One of my friends is running Technicolor on a macOS virtual machine without ARM64 support, so I can’t drop Mac Catalyst support yet.
Writing a truly native Mac app and a web client are both on my roadmap, but since this is a side project I’ll probably continue polishing the rough edges of the iOS app during the beta period.
At the moment Technicolor supports iOS 17+ and macOS 14+.
Project setup
I use XcodeGen and a project.yml file for maintaining the xcodeproj file referenced by the xcworkspace file. When using coding agents XcodeGen or similar is essentially mandatory.
I use the tv-models Swift package mentioned earlier.
I use the KeychainAccess package for storing the bearer token securely.
I use several Point-Free libraries: swift-dependencies and swift-navigation. More on these later.
Architecture rules
My client architecture is relatively templated and consistent across features. This helps me, but also helps coding agents write idiomatic code on the first attempt.
I use @Observable Store objects paired with top level SwiftUI Views for each logical screen.
All Stores follow this template:
@MainActor @Observable final class ExampleStore {
    struct State: Equatable {
        // Local feature state
    }

    @CasePathable
    enum Destination {
        // Navigation destinations with associated stores
        case detail(DetailStore)
        case settings(SettingsStore)
    }

    struct Actions {
        // Callback functions for parent communication
        var completion: (() -> Void) = unimplemented()
    }

    var state: State
    var destination: Destination?
    var actions = Actions()

    @ObservationIgnored @Dependency(\.service) var service
    private let token: Token  // Immutable data

    init(parameters) {
        // Initialize state and private properties
    }

    func task() async {
        // Startup or reappear
    }

    func showDetailButtonTapped() async {
        // User actions from the view layer e.g. pushing a new view
        destination = withDependencies(from: self) {
            .detail(DetailStore())
        }
    }

    private func helperMethod() { }
}
All Views follow this template:
struct ExampleView: View {
    @Bindable var store: ExampleStore

    var body: some View {
        VStack {
            ...
        }
        .task { await store.task() }
        .navigationDestination(item: $store.destination.detail) { $detailStore in
            DetailView(store: detailStore)
        }
        .sheet(item: $store.destination.settings) { $settingsStore in
            SettingsView(store: settingsStore)
        }
    }
}
Parent-child relationships follow these rules:
- Parent Store: Creates optional destination property (
var destination: Destination?) - Parent Store: Provides method to create child store (
func showChild() { destination = .child(ChildStore()) }) - Parent View: Uses
sheet(item: $store.destination.child)modifier - Child View: Accepts store as parameter (
@Bindable var store: ChildStoreorlet store: ChildStore) - Child Store: Must conform to
Identifiable(class identity-based) - Dependency Injection: Use
withDependencies(from: self)only if parent has@Dependencyvars
API Client
The API Client is not quite as streamlined as I’d like, but it’s simple to add new endpoints as needed.
I use the swift-dependencies format for the definition.
@DependencyClient
struct AppClient: Sendable {
    var createComment: @Sendable (_ input: Comment.CreateInput, _ token: Token) async -> Result<Comment.CreateOutput, Error> = { _, _ in .failure(AppClient.Error.unknown) }
    // ... one var for each endpoint
}
A notable difference from many projects is that AppClient is stateless – it does not hold onto the user’s bearer token or server environment (i.e. localhost or the server URL). Each Store is responsible for accepting the token as a dependency.
The live client is set up like this, with the static fetch function doing the heavy lifting of making the properly configured request and serializing the response.
extension AppClient {
    static func live() -> Self {
        Self(
            createComment: { input, token async -> Result<Comment.CreateOutput, Error> in
                let request = CreateCommentRequest(input: input, token: token, serverEnvironment: token.serverEnvironment)
                return await fetch(request)
            },
            /// ... all endpoints look similar
        )
    }
}
Most Requests require bearer token authorization and conform to the AuthorizedInputRequest protocol.
protocol InputRequest: FetchRequest {
    associatedtype Input: Encodable
    var authorization: AppClient.Authorization { get }
    var path: String { get }
    var input: Input { get }
    var serverEnvironment: ServerEnvironment { get }
}

protocol AuthorizedInputRequest: InputRequest {
    var token: Token { get }
}
An example request configuration:
struct CreateCommentRequest: AuthorizedInputRequest {
    typealias Output = Comment.CreateOutput
    let path = "/rooms/comments/create"
    let input: Comment.CreateInput
    let token: Token
    let serverEnvironment: ServerEnvironment
}
Again, there’s still a lot of boilerplate, but I’ve made my peace with it.
The specific endpoint can be used as a dependency in the Store:
@MainActor @Observable final class RoomStore {
    // ...

    @ObservationIgnored @Dependency(\.appClient.createComment) var createComment

    func createCommentTapped() async {
        // ...

        state.createMessageState = .mutating
        let input = Comment.CreateInput(roomID: roomID, content: state.inputText, seconds: state.inputSeconds)
        let result = await createComment(input, token)
        guard state.createMessageState == .mutating else { return }

        switch result {
        case let .success(output):
            var newState = state
            newState.comments[output.comment.id] = output.comment
            newState.createMessageState = .idle
            newState.inputText = ""
            state = newState
        case let .failure(error):
            state.createMessageState = .mutationFailed(.init(underlyingError: error))
        }
    }
}
Root architecture
The RootView and RootStore pair handles the boot sequence and handling login and logout.
struct RootView: View {
    @Bindable var store: RootStore

    var body: some View {
        ZStack {
            switch store.state {
            case .initialized:
                ProgressView()
                    .onAppear { store.onAppear() }
            case .restoringState:
                ProgressView()
            case let .signedOut(store):
                AuthenticationView(store: store)
            case let .signedIn(store):
                NavigationStack {
                    RoomsDashboardView(store: store)
                }
            }
        }
    }
}
@MainActor @Observable final class RootStore {
    enum State: Equatable {
        case initialized
        case restoringState
        case signedOut(AuthenticationStore)
        case signedIn(RoomsDashboardStore)
    }

    private(set) var state: State = .initialized

    @ObservationIgnored @Dependency(\.tokenLocalStorageClient) var tokenLocalStorageClient

    func onAppear() {
        restoreState()
    }

    private func restoreState() {
        guard case .initialized = state else { assertionFailure("unexpected state"); return }
        state = .restoringState

        let token = tokenLocalStorageClient.readToken()

        if let token {
            transitionToDashboard(token: token)
        } else {
            transitionToSignIn()
        }
    }

    // ...
}
The authenticated vs. unauthenticated domains of the app are fully isolated.
Room View

The RoomView – the async chat room for a TV show episode or movie – is the most complex screen in the app.
Its usage story is not quite the same as a prototypical chat room. And through my own usage I’m still trying to optimize the micro-decisions in the UX. Should the keyboard dismiss after the user sends a message? When should the main content auto-scroll?
I store the comments in a dictionary and group and sort them live on changes. This makes handling mutations more straightforward (the current user adds new comment, other user adds new comment, a comment is edited, a comment is deleted, etc.).
struct State: Equatable {
    // ...
    var comments: [UUID: Comment.Full]
    // ...

    var timestamps: [RoomViewModel.Timestamp] {
        let secondsGrouped = Dictionary(grouping: comments.values, by: { $0.seconds })
        let timestamps = secondsGrouped
            .sorted(by: { $0.key < $1.key })
            .map { group in
                RoomViewModel.Timestamp(
                    title: group.key.timestamp,
                    seconds: group.key,
                    comments: group.value
                        .sorted(by: { $0.createdAt < $1.createdAt })
                        .map { comment in
                            RoomViewModel.Comment(
                                id: comment.id,
                                content: comment.content,
                                username: comment.user.username,
                                relativeCreatedAt: Self.relativeDateFormatter.string(for: comment.updatedAt) ?? "??? ago",
                                color: comment.user.identityColor,
                                belongsToCurrentUser: comment.user.id == meID
                            )
                        }
                )
            }
        return timestamps
    }
}
Read-only data fetching state in the app is handled by the DataState struct. Mutation state is handled by the FallibleMutationState struct. I intentionally do not store the actual data in this struct (but I do store the Error).
enum DataState: Equatable {
    case initialized
    case loading
    case loaded
    case reloading
    case loadingFailed(StoreError)
}

enum FallibleMutationState: Equatable {
    case idle
    case mutating
    case mutationFailed(StoreError)
}
RoomStore.State handles the following read-only data and mutation data states:
struct State: Equatable {
    var dataState: DataState
    var createMessageState: FallibleMutationState
    var editCommentState: FallibleMutationState
    var deleteMessageState: FallibleMutationState
    var updateWatchedState: FallibleMutationState
    var leaveRoomState: FallibleMutationState
    var deleteRoomState: FallibleMutationState
    var isShowingLeaveRoomConfirmation: Bool
    var isShowingDeleteRoomConfirmation: Bool

    // ...
}
The available mutations and confirmations start to add up quickly. For this particular View, it might actually be worth it to abstract the current mutation state into its own Enum so that I can more simply enforce only one mutation is happening at a time.
Dashboard
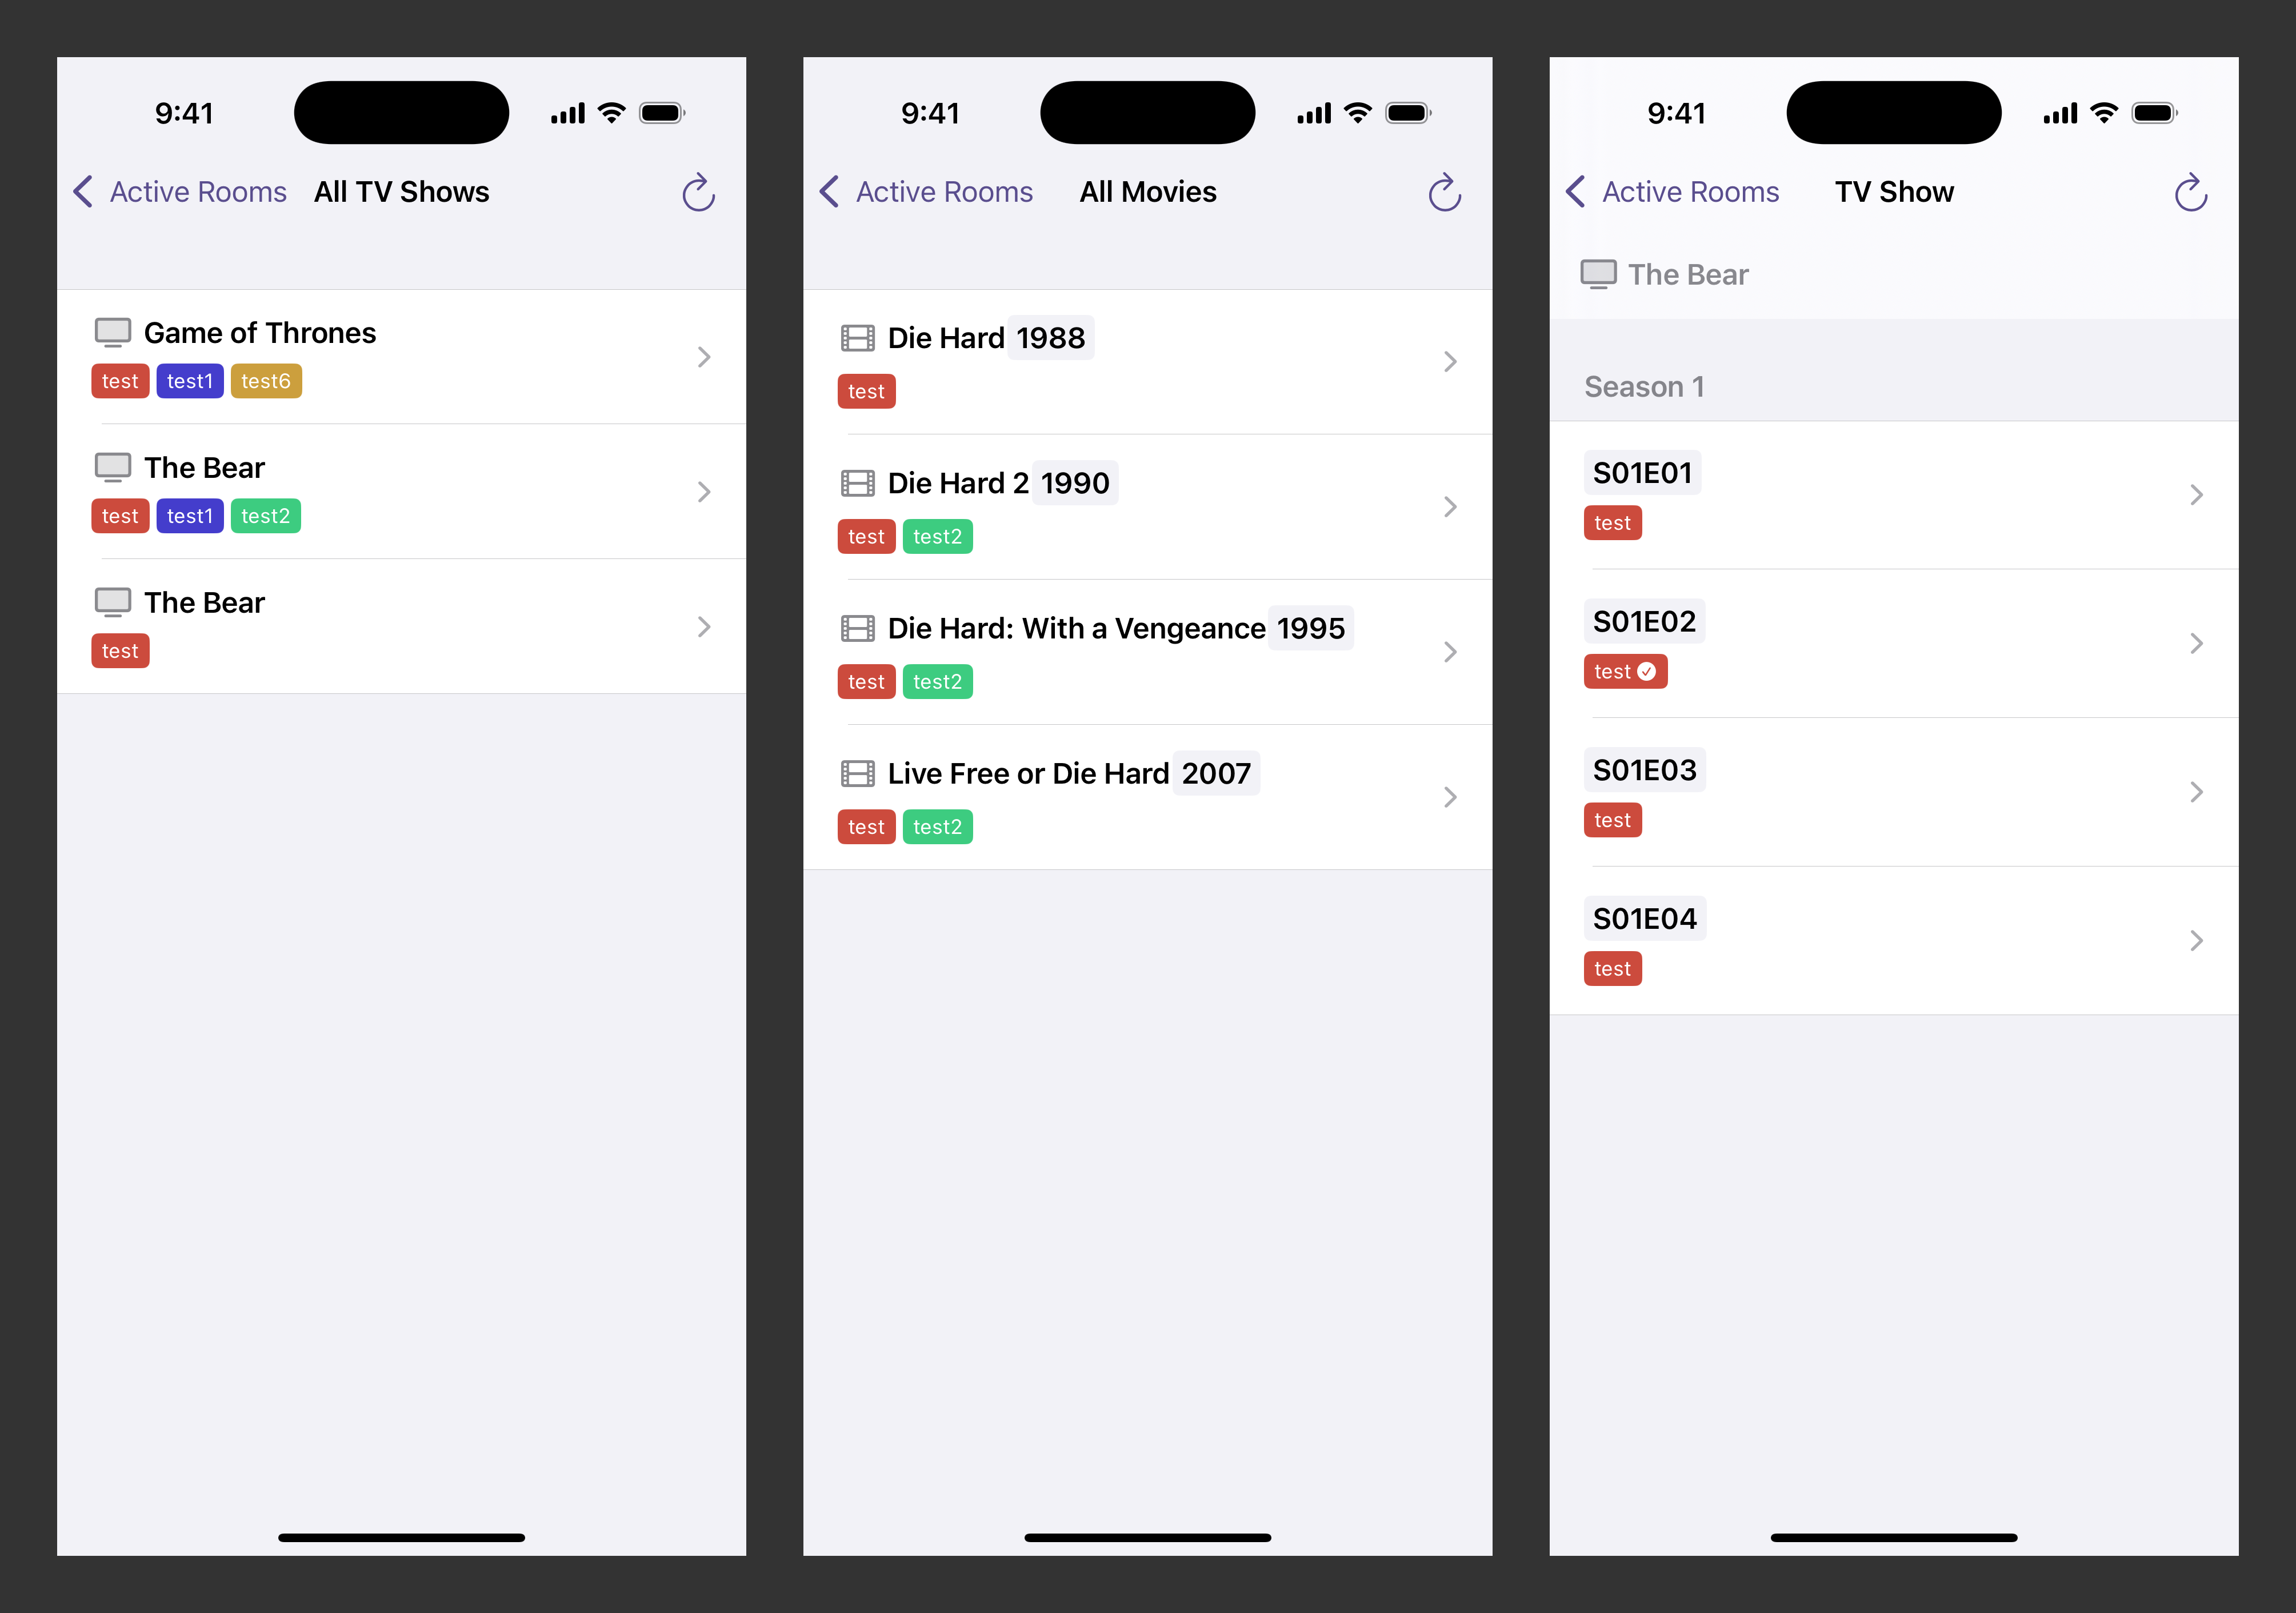
In my initial designs of Technicolor, the dashboard was a simple list of all Rooms ordered by creation date. There was a lot of burden on each user to keep track of which episodes they’ve watched, periodically check which episodes their friends have watched, and periodically check for replies.
In this latest iteration of Technicolor, I used some additional state like “Mark as Watched” and some complex SQL queries to make watchlists easier to manage, especially for power users (like me) who are watching several shows with several groups of friends over potentially multiple weeks.

The dashboard now groups sections with the following rules:
- TV shows by members: if you’re watching the same show with multiple groups, these Rooms will be grouped separately
- All movies by members: if you have a “weekly movie night” with the same set of friends, all those movie Rooms will be grouped into the same section.
By default, Rooms that are unwatched by at least one member will be included on the dashboard. Once all members have finished watching, the Room will appear for the next 7 days to allow time for further discussion.
Each scenario has its own archive screen so you can always access past Rooms. There’s also a comprehensive archive screen that ensures you can even find groups that have been archived.
Timestamp control
One of my pet projects within this Technicolor was a custom timestamp adjustment control. It’s still a work in progress but it’s been fun to iterate on.
The goal of the control is to make it easier to adjust the timestamp (e.g. 15:34) of your comment to the timestamp of the running show. That is, easier than typing the timestamp using the iOS software keyboard. On macOS with a hardware keyboard it’s easy enough to type 15:43 this is my comment.
The custom timestamp control works by tapping and dragging up and down. During a drag, moving your touch to the right adjusts the fine-tune to get better accuracy.
Push notification support
One of the reasons I was excited to make native clients for Technicolor was push notification support.
Once a Room member finishes watching an episode, they tap “Mark as Watched”. This not only updates the Room status for the Dashboard, but it also sends a push notification to the other Room members. If the other members have already watched, this push will be a trigger for the user to check out the new comments. If the other members haven’t watched yet, this push is a good reminder they should watch the episode soon.
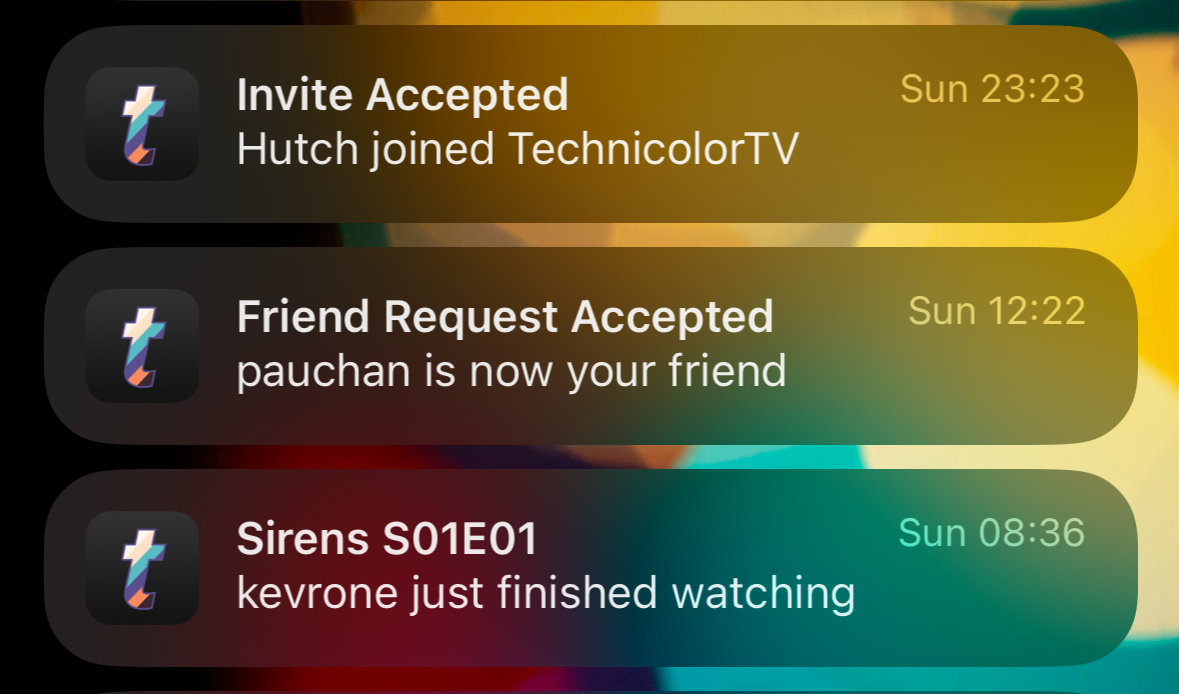
There are also quality-of-life pushes for when a user accepts your invite and joins Technicolor, when you receive a new friend request, and when a user accepts your friend request.
There’s still one missing flow: I’d like to add a timeout triggered push notification that sends in the situation that:
- User A has already finished watching an episode
- User A replies to comments after User B finishes watching
- 30 minutes have passed since the last comment from User A
This would ensure User B sees the replies from User A, but doesn’t need to get an individual push notification for each comment.
Deployment script
Working on indie projects by myself, I’ve generally found it fast enough to do all my deployment to App Store Connect manually (but using a checklist).
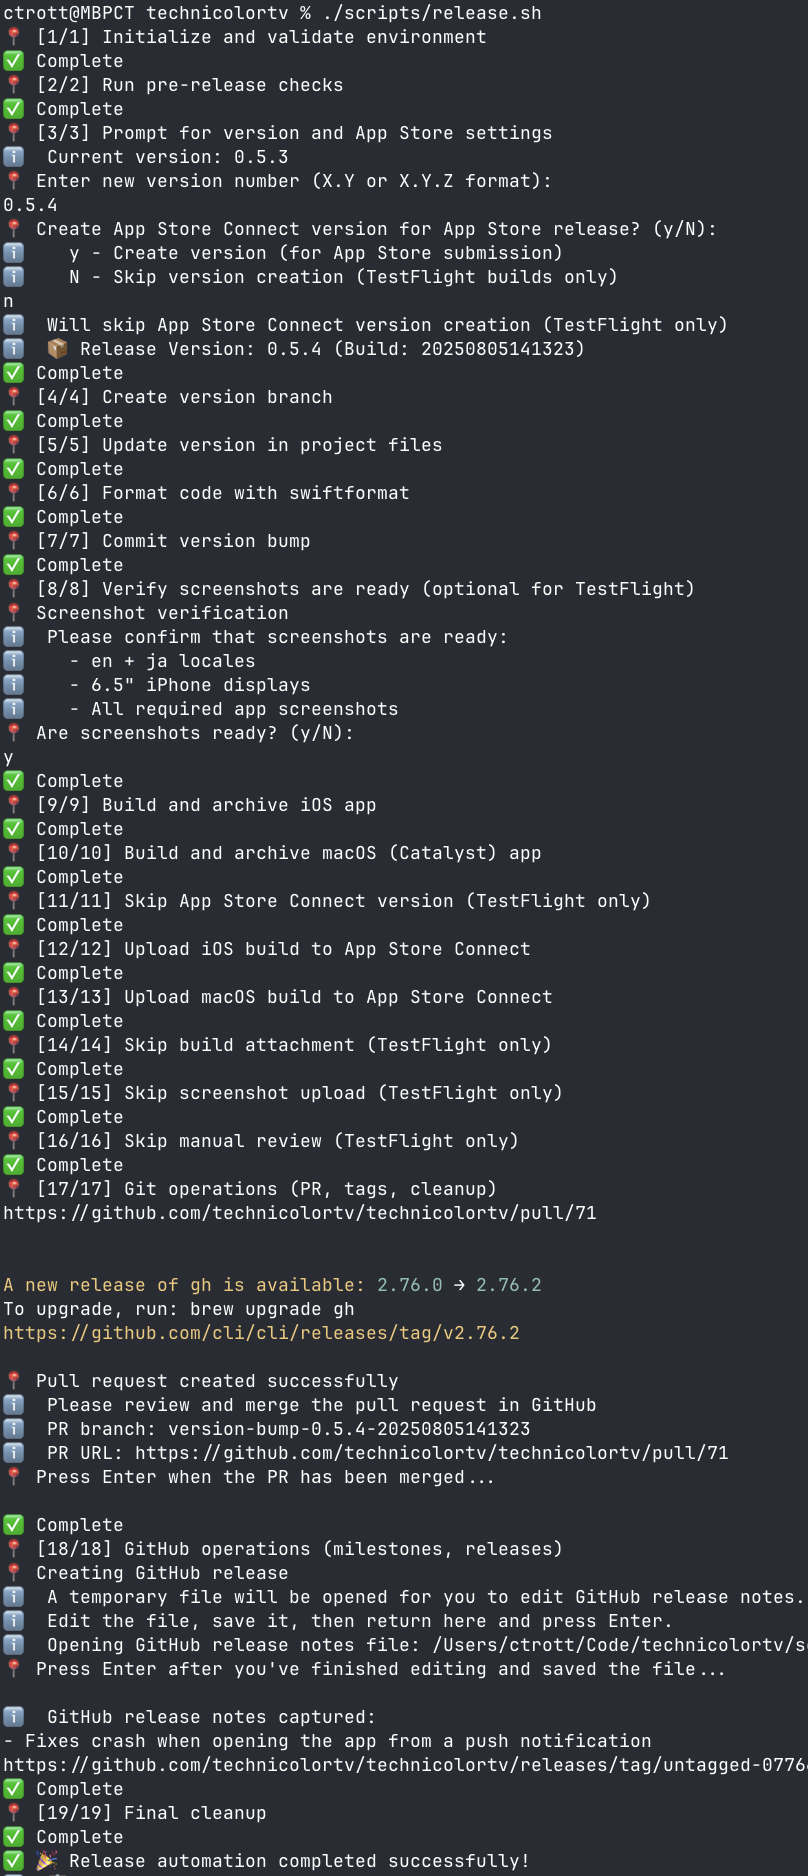
However, for Technicolor I need to build and upload both an iOS and macOS version. This was just enough tedium that I decided to vibe code a deployment bash script that handles the minutiae of deployment.
It took a very long day of debugging certificate and provisioning profile issues, but eventually I got the script working. This has made it marginally easier to ship new builds to my TestFlight beta testers. The 24-48 hour turnaround of TestFlight App Review is still a drag though.
Lessons learned
Complexity of social networks
There’s a lot of essential complexity in social networks and chat apps. As a mobile dev that usually works on the client side, it was great experience learning how to manage things like authentication, schema design for social network relationships, and server deployment.
Standardized architecture
Especially for CRUD apps, it’s incredibly important to find an architecture that makes each feature as templated and boring as possible. Predictable and well-documented features enable coding agents to accelerate development of the features that are necessary but forgettable by users and allow you to focus on the features that make your app unique.
Choice of web framework
It’s hard for me to recommend Swift on the server as a pragmatic choice for a production web service. All of its strengths don’t really make up for how far behind it is in the broader web framework ecosystem. Maybe in another several years if the Swift language has stabilized and the Swift community outside app development grows.
Long-running side projects using volatile technology stacks
I’m glad I finally found 2-3 uninterrupted weeks that I could use to get this project modernized and in a shippable state. As a side project, having a weekend available here and there usually meant that I could only tackle one small feature at a time (I remember spending a coveted 4-day weekend chipping away at getting the first deployment set up). Too much effort was burned rewriting due to language and framework and hosting churn. However, having this project did serve as a useful test bed for experimenting with and immersing myself in new ideas before introducing them into production projects at my day job.
QA as the development bottleneck
In this recent sprint, I found QA to be the bottleneck for feature development. Coding agents have significantly compressed the overall time and effort required for the system design and code writing parts, but to actually verify your feature does what it’s supposed to still means setting up an environment to experience the feature exactly as the user will experience it. That means a feature that only requires booting up the simulator and tapping a button to verify correctness will take 10 or 50 or 100 times less time to validate than installing a build on multiple devices, logging in with different test users, tapping through several screens in a specific order, and verifying the delivery and contents of a push notification. When estimating scope for a feature I want, I now consider the QA burden much more seriously than the one-shot implementation time.
Conclusion
Even after over a decade of intermittent development, Technicolor is still in its early stages. I hope this post gave you some insight into what its been like as a solo dev working on a full-stack Swift project.
If you’re considering or working on something similar, or you want more detail on anything I’ve written about in this post, feel free to reach out on Mastodon or Twitter or email. As of this posting I’m also available for consulting work.