Modeling View State
In this post we’ll take a look at techniques to model view state in Swift. The goal of this post is to show how we’d go about translating a mockup like the one we’d receive from a designer and convert it into a set of inert view models that fully describe all possible states of our view, but without referencing UIKit.
In subsequent posts, we’ll look at techniques to transition from one view state to another, ways to create an interactor to orchestrate this process over time, and finally how to consume this view model in a view controller.
Background
In many common architectures, the only way to determine the current state of a view is to query individual properties of UIView subclasses or visually inspect the final rendering of a view snapshot. Transitions between view states are handled on an ad-hoc basis or the previous view state is simply ignored. Testing is either ignored or implemented with complicated UI-based tooling.
Our goal with this technique is to have a full representation of all view states as a simple data structure in a separate conceptual layer from our UI.
The pros of this technique:
- Easier to manage secondary view states like loading, error, and empty.
- Testing is less complicated, and tests run faster.
- Modularization: it’s easier to compose interactors and view models.
- Fewer bugs related to bad view state.
The cons of this technique:
- Significantly more code.
- All edge cases must be handled explicitly.
- More upfront planning.
- More code must be changed if the design changes.
Example
In order to illustrate this technique, we’ll be working through the user profile screen of a fictional social media app I just threw together. Any mockups you receive will probably look a lot nicer than this one 😉.
Version 0
In this week’s sprint, we’ve been asked to implement a simple user profile screen. It won’t have all the bells and whistles yet. Our product manager has decided to push those to version 2.
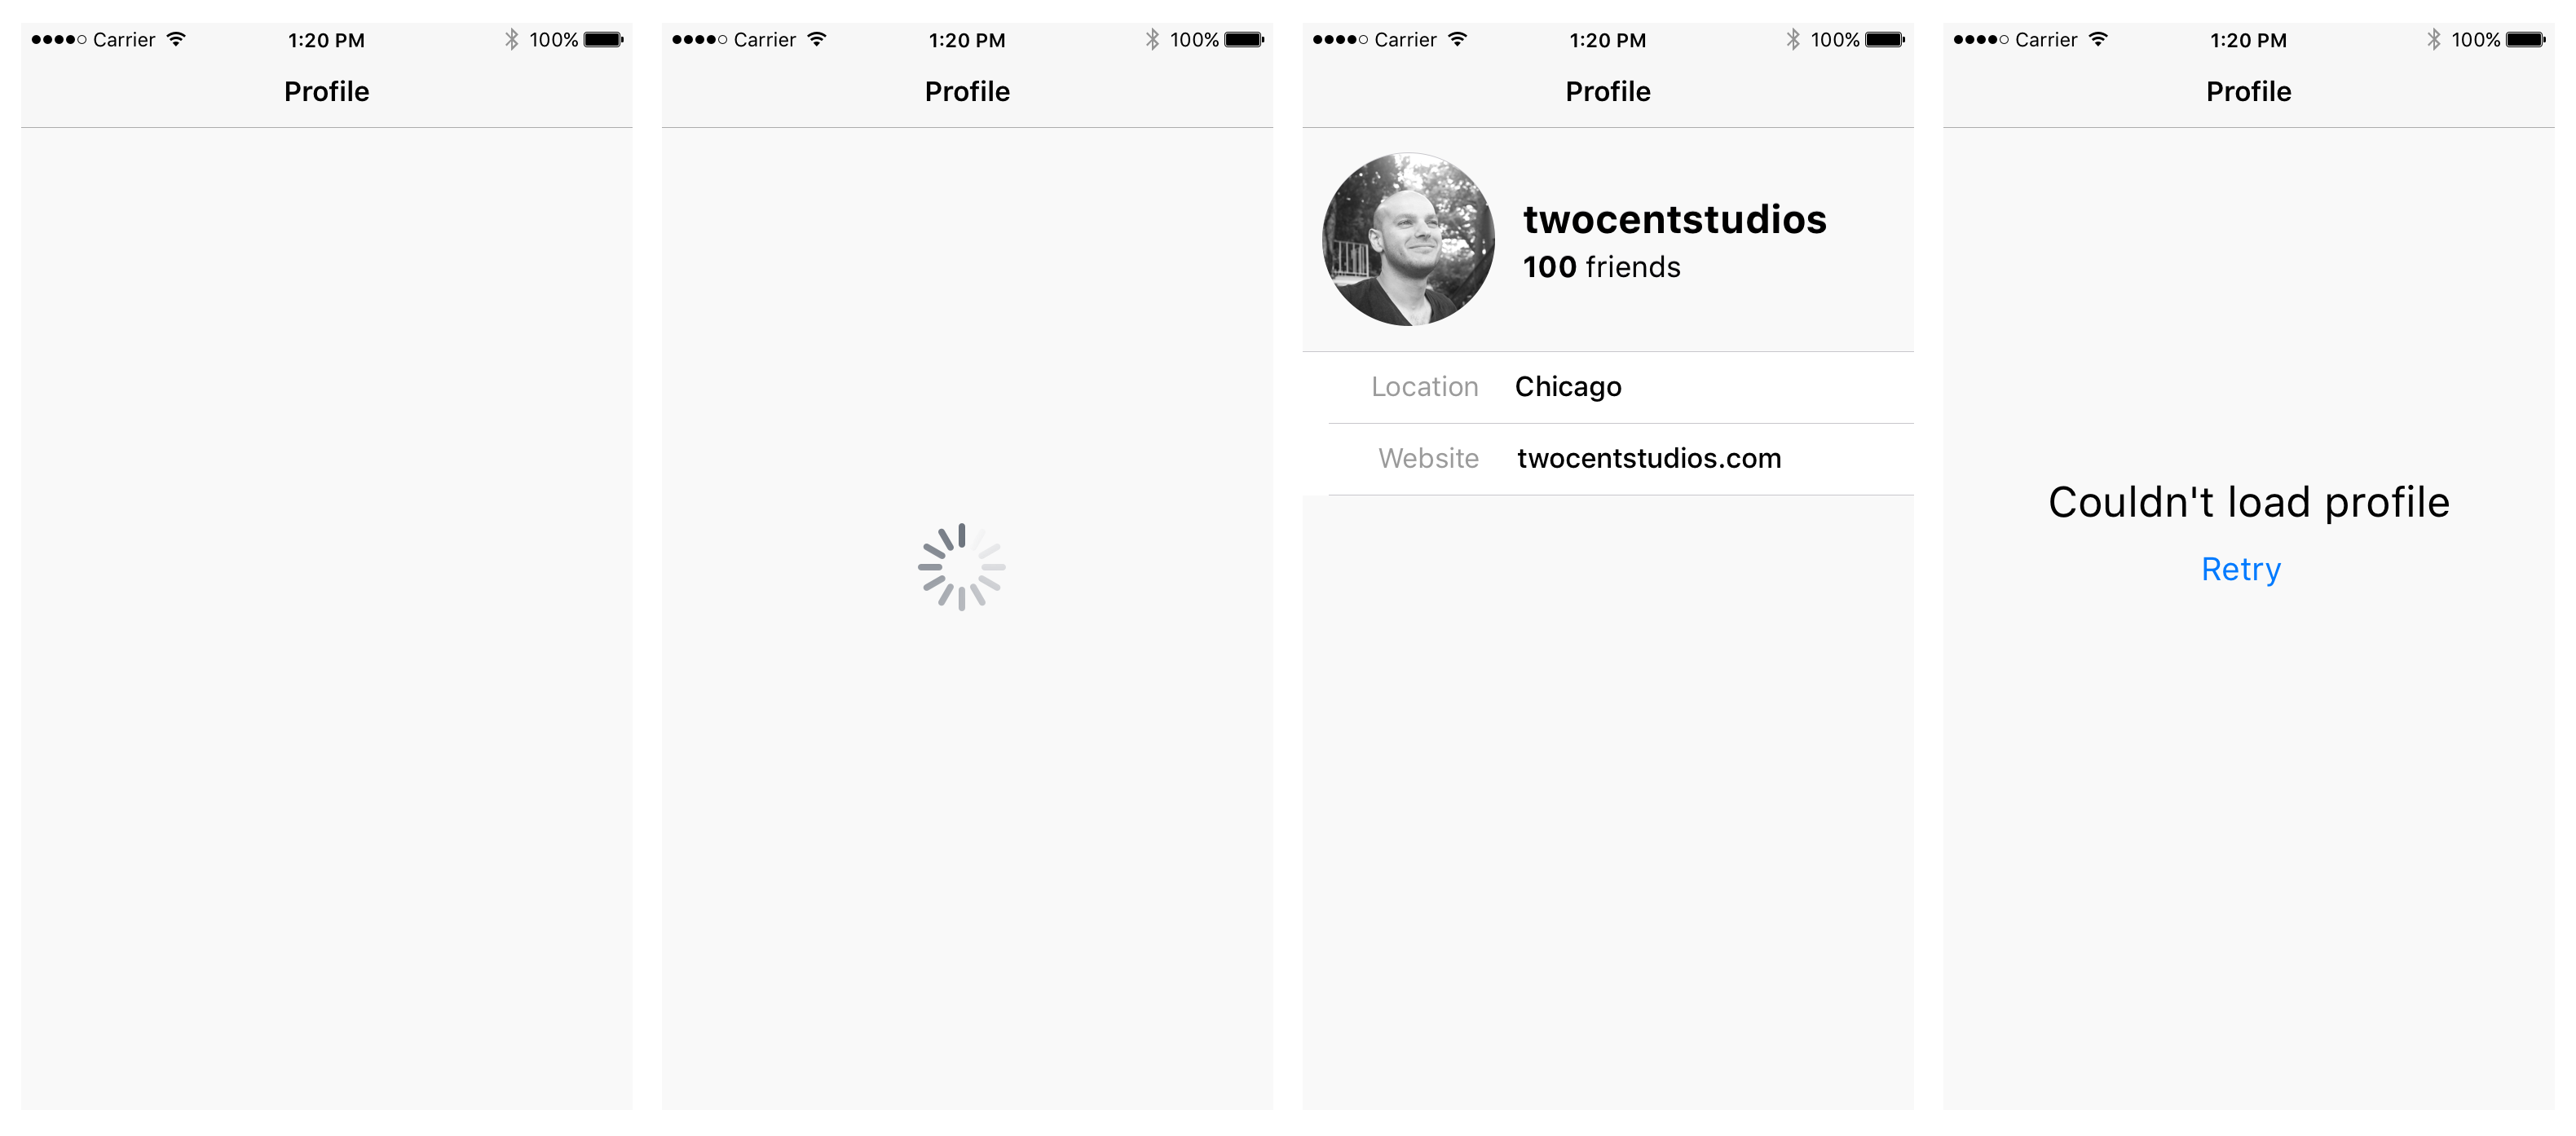
Our designer has sent us an initial mockup:

Without much thought we get started with our implementation.
Let’s say our models were previously specified by the backend engineers.
struct User {
    let id: Int
    let avatarURL: URL
    let username: String
    let friendsCount: Int
    let location: String
    let website: URL
}
Based on the mockup, our view model is pretty straightforward. Just a little transformation for friendsCount and website.
// V0
struct UserViewModel {
    let avatarURL: URL?
    let username: String?
    let friendsCount: NSAttributedString?
    let location: String?
    let website: String?
}
Note that these properties are all optional. This decision is somewhat of a judgement call, but since the properties we’ll be setting on the UIKit views are optional, it makes sense that we may want to distinguish between a none value and an empty value.
The V0 view model above is generally where most of us would start coding up view controllers. However, we’d soon realize that we’re missing a few view states.
Version 1
We’ve realized that user profile data is loaded asynchronously from the server, so we request a loading state mockup as well. Our designer obliges:

In this simple case, our designer thinks it’s fine to block the whole screen until the data has been loaded. We could probably optimize this, but we’ll let it go for version 1.
We also inform our designer that our customers may encounter network errors and we should give them the option to retry loading.
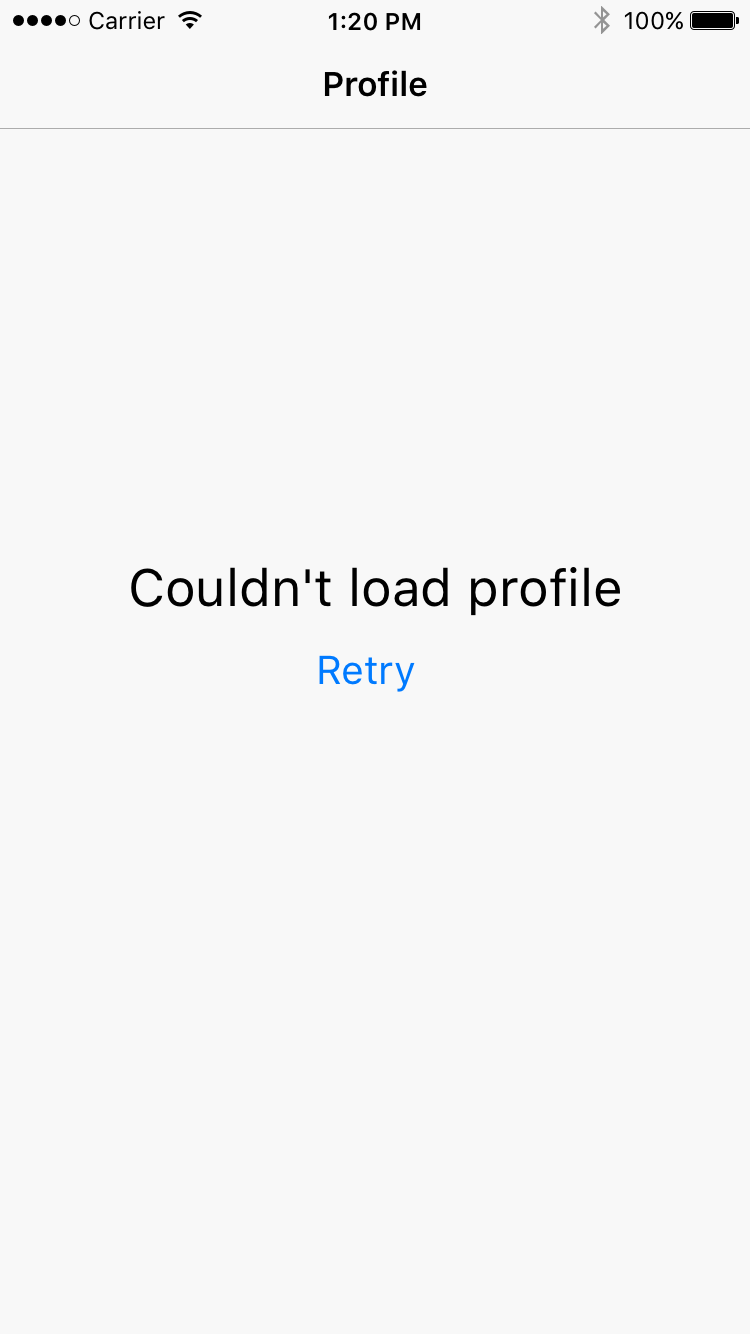
Our designer provided a fine looking error state for the profile, but there’s one more state we need. Our profile screen actually has a state before we’ve started our initial load.

And with that last screen, we’ve covered all the cases we need for V1.
We can now start modeling the rest of our view state, confident that our users will have a better experience if they have a slow or spotty data connection.
The responsibility of our view model is to transform model data into a representation that is immediately consumable by objects in the view layer with very little further transformation. In practice, this is more art than science so-to-speak. There are many correct solutions. View model design can still be heavily reliant on the specifics of how we decide to implement the view layer, e.g. using a UITableView versus using normal UIViews and a UIScrollView.
Based on the current mockup, I’m going to implement the view layer without a UITableView since the identity and location of views is known at compile time. To implement the loading and error states, I’ll add a full screen error view and loading view to the view hierarchy and toggle their hidden states.
The output properties for our view model will now be the following:
// V1 - only outputs
struct UserViewModel {
    let avatarURL: URL?
    let username: String?
    let friendsCount: NSAttributedString?
    let location: String?
    let website: String?

    let isHidden: Bool
}

struct LoadingViewModel {
    let isHidden: Bool
}

struct ErrorViewModel {
    let message: String?
    let actionTitle: String?

    let isHidden: Bool
}

struct ProfileViewModel {
    let userViewModel: UserViewModel
    let loadingViewModel: LoadingViewModel
    let errorViewModel: ErrorViewModel
}
Since we’re going to have three distinct subviews (user, loading, and error), we’ll create a separate view model for each. We’ve also added a isHidden property to UserViewModel for the initialized state before loading begins.
On every view state change, we can set all the properties on all our views. The view layer won’t need to ensure its states are consistent. That responsibility resides in the view model and can be tested independently.
Now that we’ve determined the outputs that our views need, let’s go back and figure out the inputs and internal state we need to determine those outputs.
// V1 - inputs and outputs
struct UserViewModel {
    let avatarURL: URL?
    let username: String?
    let friendsCount: NSAttributedString?
    let location: String?
    let website: String?

    let isHidden: Bool

    init(user: User?) { /* ... */ }
}

struct ErrorViewModel {
    let message: String?
    let actionTitle: String?

    let isHidden: Bool

    init(error: Error?) { /* ... */ }
}

struct LoadingViewModel {
    let isHidden: Bool
}

struct ProfileViewModel {
    enum State {
        case initialized
        case loading
        case loaded(User)
        case failed(Error)
    }

    let state: State

    let userViewModel: UserViewModel
    let loadingViewModel: LoadingViewModel
    let errorViewModel: ErrorViewModel

    init(state: State) {
        self.state = state

        switch state {
        case .initialized:
            self.userViewModel = UserViewModel(user: nil)
            self.loadingViewModel = LoadingViewModel(isHidden: true)
            self.errorViewModel = ErrorViewModel(error: nil)
        case .loading:
            self.userViewModel = UserViewModel(user: nil)
            self.loadingViewModel = LoadingViewModel(isHidden: false)
            self.errorViewModel = ErrorViewModel(error: nil)
        case .loaded(let user):
            self.userViewModel = UserViewModel(user: user)
            self.loadingViewModel = LoadingViewModel(isHidden: true)
            self.errorViewModel = ErrorViewModel(error: nil)
        case .failed(let error):
            self.userViewModel = UserViewModel(user: nil)
            self.loadingViewModel = LoadingViewModel(isHidden: true)
            self.errorViewModel = ErrorViewModel(error: error)
        }
    }
}
The three inner view models (UserViewModel, LoadingViewModel, ErrorViewModel) are initialized with an optional model object (I’ve elided their implementations).
The primary view model (ProfileViewModel) is initialized with an enum State, with each case representing one state from our designer’s mockup.
Within the initializer, we map each state to a fully configured set of outputs. A different object will be responsible for initializing ProfileViewModel and determining valid state changes.
With that, we now have a fully specified view model. We’ll also have a very light view controller since all we have to do is assign all relevant properties directly whenever the view state changes. (As previously mentioned, we’ll discuss the rest of the implementation of this system in subsequent posts).
Version 2
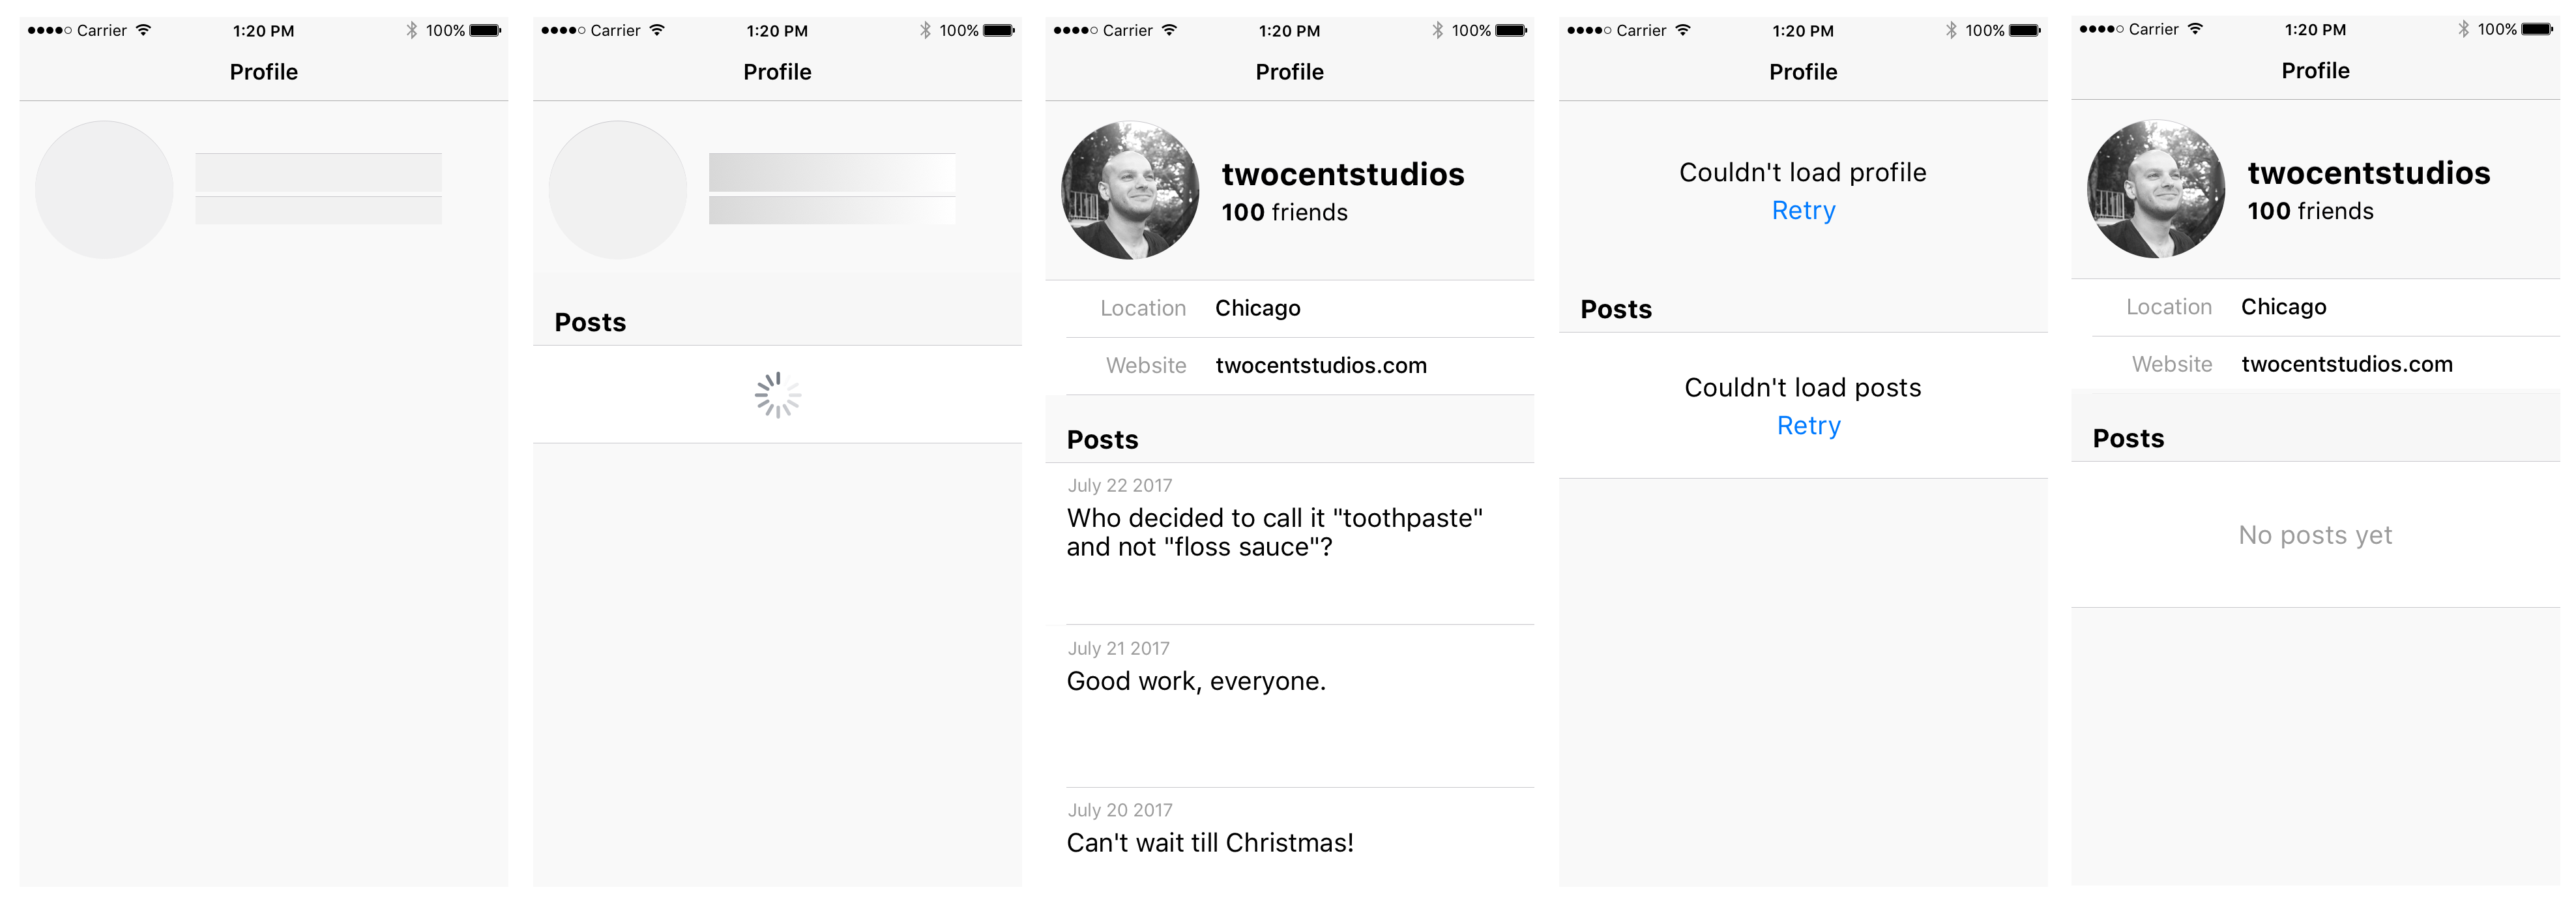
Version 1 has been released into the wild and now our product manager wants to add the user’s posts to their profile screen.
After some planning with design and our backend team, it’s been decided that user profile data and user post data will come from separate API endpoints. Since we’re a relatively new service, we won’t worry about paging yet (I’d like to cover paging in a future blog post).
Our product manager and designer have also determined that they’d like a prettier loading state for the user attributes. (Our designer has also preemptively mocked up all the required states for us).
Let’s enumerate the changes we’ll have to make to the view models:
- Since our view now includes an indeterminate amount of posts, we’ll convert our view layer to use a
UITableVieworUICollectionViewinstead of a static view. - That means we should split up our header view into multiple cells.
- We’ll need to make a new shimmering
UILabelclass for displayinginitialized,loading, andloadedstates. - We have two independent view states (profile and posts). We should model these separately and compose them.
Let’s start by creating the smallest building blocks.
// V2 - building blocks
struct ErrorViewModel {
    let message: String?
    let actionTitle: String?
}

struct LoadingTextViewModel {
    enum State {
        case initialized
        case loading
        case loaded(NSAttributedString?)
    }

    let state: State

    let isLoading: Bool
    let text: NSAttributedString?
}

struct ProfileHeaderViewModel {
    let avatarURL: URL?
    let username: LoadingTextViewModel
    let friendsCount: LoadingTextViewModel
}

struct ProfileAttributeViewModel {
    let name: String?
    let value: String?
}

struct Post {
    let id: Int
    let date: Date
    let body: String
}

struct PostViewModel {
    let date: String?
    let body: String?
}
Each of the above will map 1-to-1 with a cell, except for LoadingTextViewModel.
We can compose the above view models into the view models for profile and posts.
// V2 - component view models
struct ProfileViewModel {
    enum State {
        case initialized
        case loading
        case loaded(User)
        case failed(Error)
    }

    enum ViewModelType {
        case header(ProfileHeaderViewModel)
        case attribute(ProfileAttributeViewModel)
        case error(ErrorViewModel)
    }

    let state: State

    let viewModels: [ViewModelType]

    init(state: State) { /* ... */ }
}

struct PostsViewModel {
    enum State {
        case initialized
        case loading
        case loaded([Post])
        case failed(Error)
    }

    enum ViewModelType {
        case loading
        case post(PostViewModel)
        case empty(String)
        case error(ErrorViewModel)
    }

    let state: State

    let viewModels: [ViewModelType]

    init(state: State) { /* ... */ }
}
Both ProfileViewModel and PostsViewModel are responsible for transforming their input State into a list of viewModels corresponding 1-to-1 with cells.
And finally we can compose these two view models into UserViewModel.
// V2 - screen-level view model
struct UserViewModel {
    enum ViewModelType {
        case profileHeader(ProfileHeaderViewModel)
        case profileError(ErrorViewModel)
        case profileAttribute(ProfileAttributeViewModel)
        case contentHeader(String) // "Posts"
        case contentLoading
        case contentEmpty(String)
        case contentError(ErrorViewModel)
        case post(PostViewModel)
    }

    // Inputs
    let profileViewModel: ProfileViewModel
    let postsViewModel: PostsViewModel

    // Output
    let viewModels: [ViewModelType]

    init(profileViewModel: ProfileViewModel, postsViewModel: PostsViewModel) {
        self.profileViewModel = profileViewModel
        self.postsViewModel = postsViewModel

        let profileViewModels = profileViewModel.viewModels.map(UserViewModel.toViewModel)
        let postsHeaderViewModels = [ViewModelType.contentHeader("Posts")]
        let postsViewModels = postsViewModel.viewModels.map(UserViewModel.toViewModel)

        let innerViewModels: [ViewModelType] = profileViewModels + postsHeaderViewModels + postsViewModels

        self.viewModels = innerViewModels
    }

    private static func toViewModel(_ viewModel: ProfileViewModel.ViewModelType) -> UserViewModel.ViewModelType {
        /* ... */
    }

    private static func toViewModel(_ viewModel: PostsViewModel.ViewModelType) -> UserViewModel.ViewModelType {
        /* ... */
    }
}
UserViewModel only needs to map the inner view model types to its own enum UserViewModel.ViewModelType and concatenate the results into one array. UserViewModel has no state of its own. It composes the contents of its view models and exposes its own set of view models to the view layer.
The view layer will only need to access viewModels.
We now have the option of using ProfileViewModel and PostsViewModel alone on other screens, or composing them with other view models into other combinations.
Conclusion
Modeling view model state is only a small part of designing a robust screen. I’ve elided a lot of the implementation details in this post in order to keep it more concise. I’ll explore the integration of these view models into the rest of the system in subsequent posts.
Note that I’ve also elided Equatable implementations for each of these structs. Equatable conformance is important in doing diffing on the view side since our entire screens view model will change on every update to the composed view models.
It should now be easier to understand the pros this technique:
- The view controller is now mostly glue code, setting view models on subviews.
- Comparing view states when testing (with
Equatableimplemented) is as simple asXCTAssertEqual(viewModel, expectedViewModel). PostsViewModel’s logic can be used on other screens. There’s even some breathing room for using different view designs with the same data.- Using explicit enumerable input states for our higher-level view models ensures that no bad view states can occur.
- Once view states are explicitly defined, it’s trivial to pass off the work of creating a view layer to another engineer.
And the cons:
- Lots more code to write and maintain, especially when considering manually writing
Equatable. - Some background knowledge about how to implement the view hierarchy in
UIKitneeds to be known ahead of time in order to correctly design the view models on the first try.
I consider the overhead to be worthwhile if your objective is robust code, the design is relatively stable, and testing is part of your culture. Conversely, it might not be worthwhile if your product design is undergoing rapid change, secondary view states are not important to product validation, and a certain quantity of bugs are acceptable.
Other recommended reading on this topic: Modelling state in Swift.
Thanks for reading, and please let me know your thoughts and suggestions. I’m @twocentstudios on Twitter.
Thanks to Evan Coleman and Ernesto Carrion for reading drafts of this post.