Transitioning Between View States Using Reducers
In this post we’ll take a look at a technique to model transitions between view states in Swift. We’ll also look at how to model the commands that will initiate view state transitions, and the effects that will be produced by view state transitions.
In the last post we looked at modeling the view states themselves. We’ll revisit some of that code and build upon it in this post, but I would encourage you to read that post before continuing.
In subsequent posts, we’ll look at how to use our view models from the previous post and reducers from this post to create a full state machine in what we’ll call an interactor.
Background
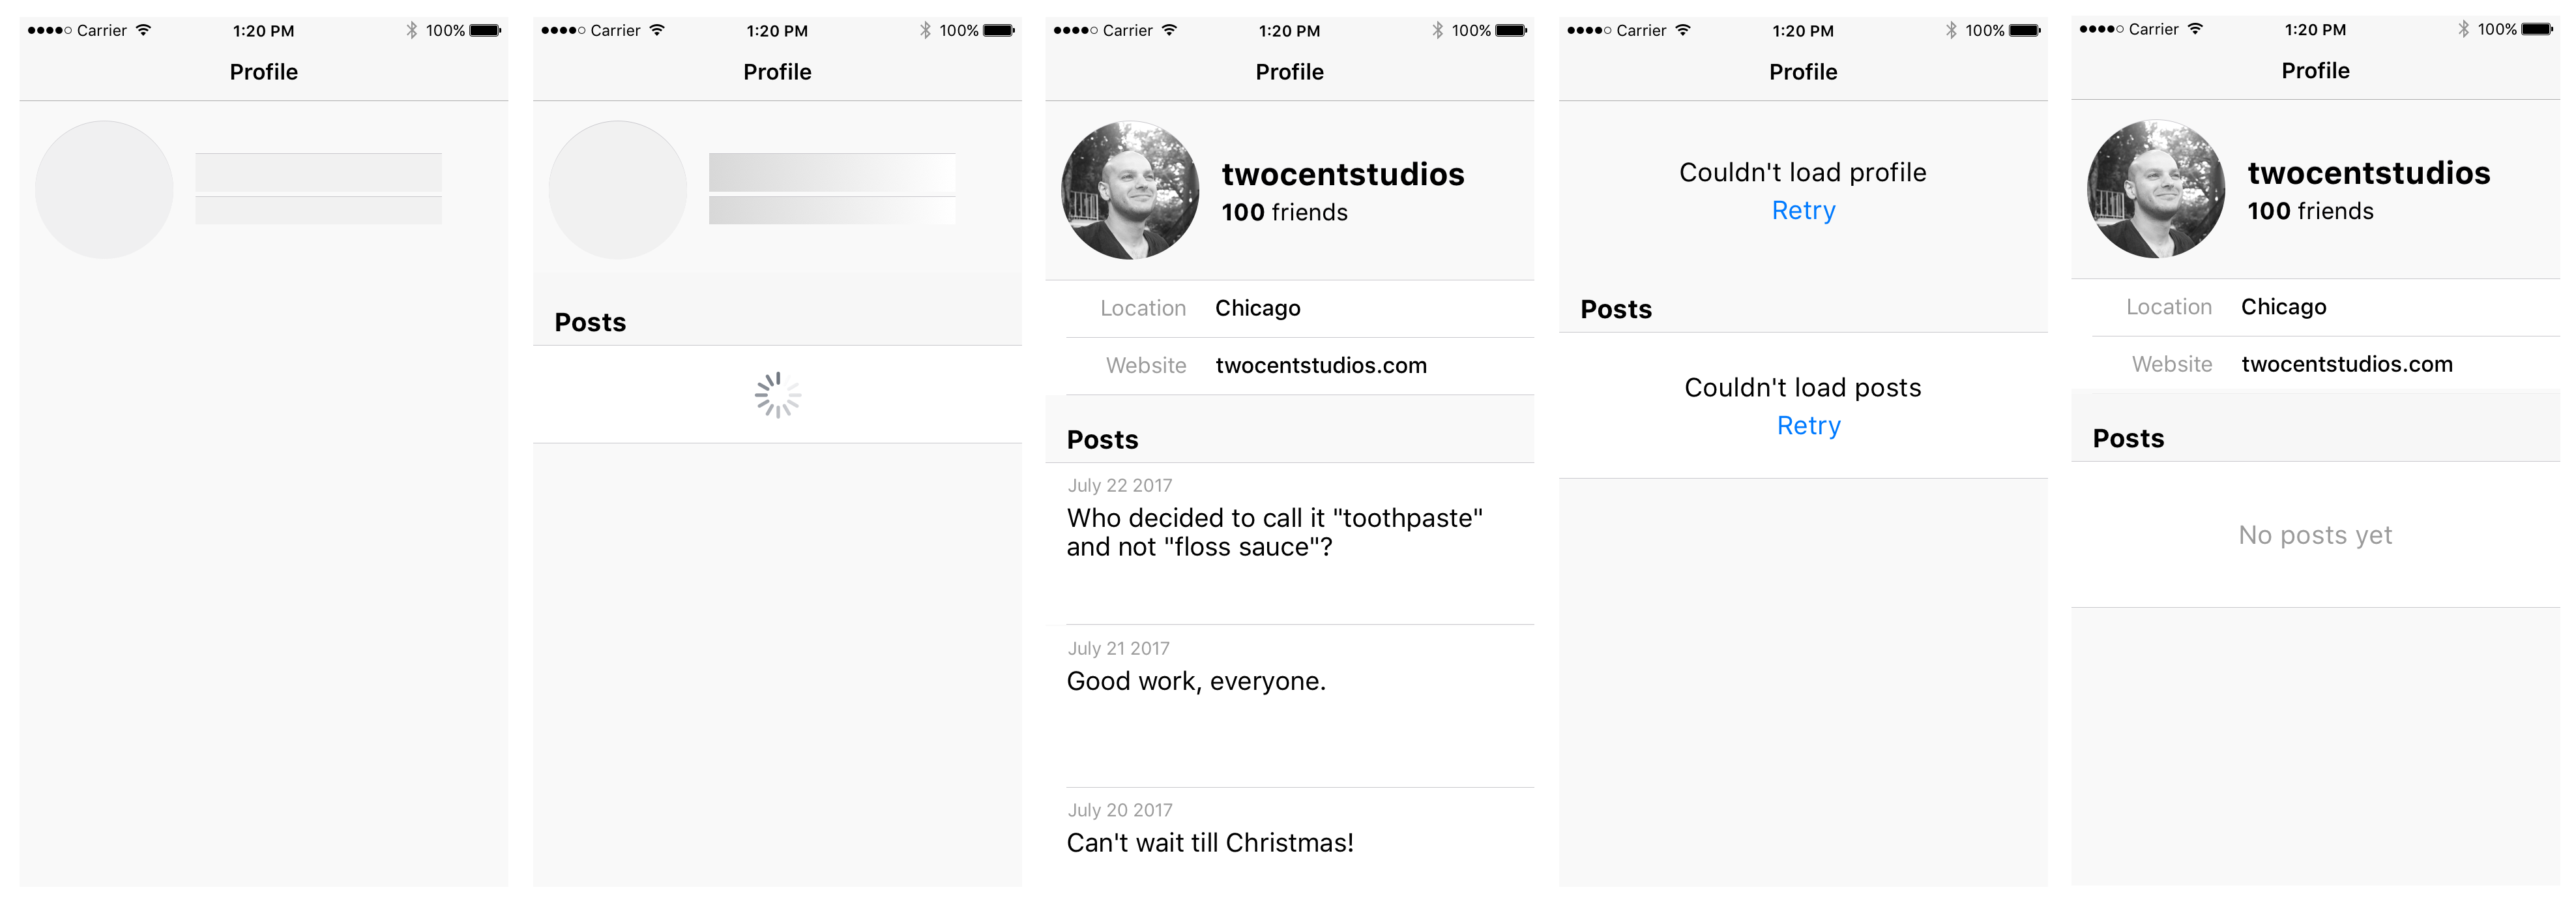
In the last post, we ended up with a user profile screen that encapsulated two separate pieces of information: the user’s profile data and the user’s posts. Each has its own associated view states including initialized, loading, loaded, and failed.
We have some view states, and now we need a way to describe how we’re allowed to transition in between those view states.
Let’s look at a technique we can use to formalize these view state transitions. We’ll call this technique a reducer. A reducer will:
- List all commands that can change the view model state (
Command). - List all effects that describe side-effects of view model state transitions (
Effect). - Determine all valid transitions between view model states (
ViewModel.State&State).
There is lots of prior art on reducers, mostly from the functional programming world (I’ve included several links at the end of this post). In the context of finite state machines they’re called transducers. We’re going to use reducer in this post because of the rising popularity of Redux, Elm, ReSwift, etc. The name itself is just a name, and we’ll focus as much as possible on the attributes and the responsibilities of reducers.
Goals
In many architectures, transitioning between view states is done on an adhoc basis.
- Often the previous view state is not consulted before transitioning to a view state, the result of which can be invalid view states, confusing transitions, or unwanted side-effects.
- Sometimes it’s not even possible to determine a cohesive representation of the view state because it must be derived from the property values of several unrelated
UIKitcontrols (e.g.UISwitch.isOn,UILabel.text, etc.). - The code for making view state transitions is scattered throughout a view controller and mixed in with unrelated static view configuration code.
- Updating the model (and any additional overhead) must be done on the main thread, or a complex system of locking must be mixed in with the view code.
- There is no way to unit test the logic (or lack thereof) that controls view state transitions, especially because it is mixed in with asynchronous operations.
Our goal is to define a strict interface for a system that will describe valid view state transitions. The inputs and outputs to the system will be value-types and therefore the whole system will be easily testable.
This system is not necessarily complex. You’ll see in the implementation below that our reducer:
- Is one static function.
- Works only with value types.
- Is synchronous.
- Is stateless.
Definitions
Before diving into code, let’s run through some new terms that will help us distinguish how data will flow through the reducer.
View model
We went into detail about view models in the last post. The view model is a value type that transforms a view state into some output data that is easily consumable by an object in the view layer. A view model represents a view’s state at one moment in time.
Command
Command lists the valid events that can cause transitions between view states. Alongside the view model and effect, it is one of the inputs of the reducer function.
Effect
Effect lists the valid side-effects that occur alongside a view state transition. It is primarily used as an output of the reducer, but due mostly to implementation details, it is also provided as an input to the reducer. There may be some rare situation where knowing the last effect would be useful in making a view state transition, but usually it will be ignored as an input.
State
State combines a view model and an optional effect. One input and the output of the reducer are of type State. Note that Reducer.State is a different concept than ViewModel.State.
Reducer
The general definition of a reducer is a function that takes a Command and a State and produces a new State.
Our reducer’s State combines both ViewModel and Effect. So it’s better for us to look at the reducer’s inputs and outputs more like this:
We’ll come back to these diagrams in a moment when we get to the implementation.
General Implementation
Another goal of this technique is that it can be used as a template throughout an app. The contents of each view model, effect, and command will be different, but the structure will be the same.
struct ViewModelReducer {
    enum Command {
        // cases:
        // what events can cause this view model to change?
    }

    enum Effect {
        // cases:
        // what side-effects occur alongside state changes?
    }

    struct State {
        let viewModel: ViewModel
        let effect: Effect?
    }

    static func reduce(state: State, command: Command) -> State {
        // Determine a new output State based on each input State & Command combination.
    }
}
The benefit here is that the process of writing new reducers is formalized around designing a well-specified state machine. Once you’ve designed the system, writing the code becomes the easy part.
Notice that the ViewModelReducer struct acts as a namespace. It has no properties or initializers. (It might be more syntactically correct for it to be an enum instead with no cases, but for now we’ll keep it as a struct).
Profile Implementation
Let’s implement the ProfileViewModel: the top half of the user view.
The view model we created last time:
struct ProfileViewModel {
    enum State {
        case initialized
        case loading
        case loaded(User)
        case failed(Error)
    }

    enum ViewModelType { /* ... */ }

    let state: State

    let viewModels: [ViewModelType]

    init(state: State) { /* ... */ }
}
At the moment, we’re only concerned with the state part as it’s the input to ProfileViewModel. The viewModels property is the output used by the view layer.
First, we’ll copy/paste the template struct from above.
// Skeleton implementation
struct ProfileViewModelReducer {
    enum Command {
        // TODO
    }

    enum Effect {
        // TODO
    }

    struct State {
        let viewModel: ProfileViewModel
        let effect: Effect?
    }

    static func reduce(state: State, command: Command) -> State {
        // TODO
    }
}
Next, let’s map out the state from ProfileViewModel.State.
- Our entry point is
Initialized. Initializedcan only go toLoading.Loadingcan transition to eitherLoadedorFailed.LoadedorFailedmay transition back throughLoading.
Next, let’s name the commands that will trigger these transitions.
- The
Loadcommand can be issued from three states. LoadedandFailedcommands are only valid when the current state isLoading.
Let’s go ahead and add these commands to our implementation.
// Added `Command`
struct ProfileViewModelReducer {
    enum Command {
        case load
        case loaded(User)
        case failed(Error)
    }

    enum Effect {
        // TODO
    }

    struct State {
        let viewModel: ProfileViewModel
        let effect: Effect?
    }

    static func reduce(state: State, command: Command) -> State {
        // TODO
    }
}
Effect is next.
When we receive Command.load, we want to both change the view state to .loading and kick off an asynchronous network request to load the data. Our reducer is synchronous though, so we’ll use the Effect mechanism to specify exactly what asynchronous operation should be carried out on the reducer’s behalf.
In this case, it’s enough to simply define Effect.load with no enum case associated values.
There’s are no other asynchronous requests we need to make in order to make all the other possible transitions, so the Effect enum will only have one case this time.
Below is a diagram of one state transition from .initialized to .loading.
And our updated reducer code:
// Added `Effect`
struct ProfileViewModelReducer {
    enum Command {
        case load
        case loaded(User)
        case failed(Error)
    }

    enum Effect {
        case load
    }

    struct State {
        let viewModel: ProfileViewModel
        let effect: Effect?
    }

    static func reduce(state: State, command: Command) -> State {
        // TODO
    }
}
We’re finally ready to implement the reduce function.
In the reduce function we’ll see that Swift’s enums really shine. switching over ViewModel.State and Command allows the compiler to help us out and ensure we’ve covered all possible combinations (however, if you’re in a rush, you can always specify the known states and use a default case to cover the rest).
It’s possible to switch through the cases as Command then ViewModel.State or the reverse ViewModel.State then Command. At the moment I prefer the former (and have written it below as such), but the latter may be easier to read after some time away from the code.
static func reduce(state: State, command: Command) -> State {

    // Unpack the arguments (we intentionally don't use `Effect` as an input).
    let viewModel: ProfileViewModel = state.viewModel
    let _: Effect? = state.effect
    let viewModelState: ProfileViewModel.State = viewModel.state

    // Create a convenience output `State` for invalid transitions.
    let noChange = State(viewModel: viewModel, effect: nil)

    // Switch over `command` then `viewModelState`.
    switch (command, viewModelState) {

    case (.load, .initialized),
         (.load, .loaded),
         (.load, .failed):
        return State(viewModel: ProfileViewModel(state: .loading), effect: .load)

    case (.load, .loading):
        return noChange // ignore `.load` command if we're already in a loading state.

    case (.loaded(let user), .loading):
        return State(viewModel: ProfileViewModel(state: .loaded(user)), effect: nil)

    case (.loaded, _):
        return noChange // `.loaded` command can not be handled from any other view state besides `.loading`.

    case (.failed(let error), .loading):
        return State(viewModel: ProfileViewModel(state: .failed(error)), effect: nil)

    case (.failed, _):
        return noChange // `.failed` command can not be handled from any other view state besides `.loading`.
    }
}
In the above implementation:
- We covered all combinations of the 3
Commands and 4ViewModel.States. - Invalid transitions are handled by not changing the view model and performing no side-effects (
noChange). You may also consider addingassertionFailures to catch these attempted transitions during development if you believe they should never happen.
ProfileViewModelReducer is fully implemented and can be used in a dedicated interactor which will complete the state machine.
The above combination of Commands and ViewModel.States is quite common and covers a lot of cases in every day iOS development. However, you’ll find plenty of subtle differences when implementing different screens. I’d like to cover some more complicated cases in an advanced post in the future.
Why use Effect?
You may be wondering why we need Effect at all. Why not just derive side-effects directly from the view model’s state?
It’s sometimes possible to use view model directly, but in my experience mixing idempotent state changes with non-idempotent side-effects ends up being more complex than treating them separately.
In the example above, let’s say we decide to kick off a network operation if the view model state becomes loading (this operation happens outside of the reducer). If a Command.load is processed by the reducer once, then again, the output state will become loading then remain loading. With our simple logic, we will kick off two network requests. Is that what we want in all cases? Probably not.
In order to solve this problem, we would have to introduce more state checking in the code that kicks off the network operation. We’re now comparing the old state to the new state, but we’re already doing that inside the reducer! We’re now spreading business logic outside the reducer when our goal was the opposite.
The reducer is the best place to determine the next state and any side-effects that occur based on state changes.
Separating Request and Response
It may be a little difficult to understand how the asynchronous network request fits into this reducer, especially after seeing that the reducer itself is synchronous. The short answer is that we’ll see in the next post about interactors.
But to give a brief preview, the way we’ll handle asynchronous operations is by separating the request from its response. In the eyes of the reducer, the network request is just another Effect. In the eyes of the reducer, the response to that network request is just another Command that will potentially change the view state depending on when that Command is received. Anything could have happened to the view state while the asynchronous request was being made. Any situation like this will be handled in the same way: as just another input at some point in time.
In a simple view model like our example, it may seem like overkill to split the request and response. But think about a recent occasion when you’ve had to change some state based on multiple asynchronous requests triggered from multiple places in your view controller. How easy was it to make these changes in a performant and thread-safe manner? How sure were you that you had handled all the edge cases? How easy was it to test? How easy would it be to change this code based on new requirements?
Pros and Cons of Reducers
Pros
- Testing - Using value types as input/output messages to a stateless static function makes this logic trivial to test. It’s so trivial you’ll think you’ve done something wrong. You can write a test for each valid transition in complete isolation.
- Modifying code - Adding new inputs or new view states is difficult, but in a good way. The Swift compiler will guide you through the process by ensuring you’ve still handled all possible combinations of commands and view states. Your tests will ensure you haven’t broken any existing transitions.
- Reading code - Your view state transition code is easy to find: it’s in the reducer. It’s keyed by command and view state. You don’t have to hunt through a 1000 line view controller to determine which of several possible functions could be changing your view state.
- Modeling state, transitions, and effects - Modeling each of these concerns separately allows us to give each the proper consideration and do so in isolation.
- Templated problem solving - I really love having a template I can follow to solve problems step by step. I can only fit so much in my head at once. Starting from modeling all states of a view then moving on to all the ways that view state can be changed allows me to focus on one problem at a time and be confident that there are no edge cases I haven’t handled. The Swift compiler always has my back.
Cons
Similar to our last post:
- More code - There is lots more code to maintain. To be clear though, all of the conditions handled by this new code are either implicitly handled or completely disregarded in most other architectures.
- One big switch - Some programmers consider switch statements, especially long ones, to be a code smell. I’d like to hear more opinions about whether a switch statement in this context is frowned upon and why.
- Exponentially increasing transition cases - As more commands and more view states are added, the number of possible transitions that must be handled by your reducer can start to become overwhelming. When you feel overwhelmed, it may be a sign that your view model can be split into two and nested in a parent view model.
- Difficult to understand - I believe that with the right surrounding documentation (hopefully this blog post), this technique is conceptually simple, especially to programmers with some background in functional programming. However, I can imagine that dropping a developer into this code may be a confusing and frustrating endeavor.
Conclusion
In this post, we discussed using reducers as a single location to describe view state transitions and any side-effects based on those transitions.
We looked at a reusable skeleton implementation for a reducer and its four parts: Command, ViewModel, Effect, and State. We looked at the reducer function itself and the way we can use switch to handle all transitions (both valid and invalid) of the state machine.
Further reading
- Cocoa with Love: Statements, messages, and reducers
- BPXL Craft: The Value is the Boundary
- inamiy: ReactiveAutomaton
- Chris Eidhof: Reducers
- Wikipedia: Finite State Machine
- ReSwift
- Redux
Thanks for reading this post, and please let me know your thoughts and suggestions. I’m @twocentstudios on Twitter.