Stateless Coordinators
In this post, I’m presenting an experimental iOS architecture I’m calling Stateless Coordinators. Consider what I’ll present as still a work in progress. Along the way I’ll be posing questions and considerations for changes or improvements.
Update: Soroush suggested “View Controller Factories” would be a more fitting name for this pattern.
Note: all code in this post targets Swift 3.0.1 and ReactiveSwift 1.1
Introduction
The goal of this architecture is to abstract out the presentation and flow responsibility of UIViewController and its subclasses in order to make the view layer of the application more composable.
The proposed architecture is an alternate take on the Coordinator Pattern. I found inspiration in the following posts:
- Coodinators Redux
- Navigation Coordinators
- A Pragmatic Functional Reactive Architecture in Swift
- Improve your iOS Architecture with FlowControllers
Tools
The tools we’ll use are:
- Reactive programming; specifically ReactiveSwift
- Swift enums
- Stateless coordinator modules
We’ll specifically be avoiding:
- The delegate pattern
- Stateful coordinator objects
The reasons for using and not-using these tools will be discussed along the way.
If you aren’t familiar with ReactiveSwift, some of the code I’ll present will look like magic, but hopefully will still be comprehensible.
Responsibilities
At this point, I’m only going to discuss two major components to the architecture: the UIViewController family and coordinators. In the future I’d like to expand more on other ways to extract responsibilities from UIViewController (specifically view models), but for the purposes of this post, let’s assume that the view controller is responsible in one way or another for everything besides managing the presentation flow of itself or its children.
Before jumping into code, let’s enumerate the responsibilities of coordinators and view controllers.
A coordinator will be responsible for:
- Declaring a specific set of inputs and outputs that it knows how to handle.
- Accepting dependencies required by the view controller.
- Creating a view controller of a specific identity and providing it its dependencies.
- Creating a signal flow between view controller outputs and inputs with any required transformations in between.
- Application flow side effects: presenting, dismissing, pushing, or popping child view controllers, but not itself.
- Data modification side effects: performing any other side effects that don’t belong to a specific view (this one is a little hazy at the moment).
A view controller will be responsible for:
- Declaring a specific set of inputs and outputs that it knows how to handle.
- Managing a view hierarchy and keeping it updated.
- Fetching data.
- Handling user touch input.
How does it work?
One of the trademarks of a reactive architecture is “setting up the world” so to speak when initializing a system. Essentially wiring together inputs and outputs so that dynamic events and behavior is routed at runtime.
We have two seemingly conflicting goals:
- Leverage standard UIKit view controller lifecycle and presentation.
- Remove the presentation responsibility from view controller subclasses.
Our strategy will be to create a standardized public extension point on each view controller in which we can add behavior at view controller creation time. The extension point will be a Signal and we’ll add behaviors by attaching observers. By tying the lifetime of these behaviors to their view controller, we can avoid the common difficulties of working against UIKit patterns.
That strategy probably doesn’t make sense yet. It’s okay because we’re going to go through lots of code examples.
Code examples
A goal of this architecture it to provide a template for modules of our system that is both predictable and flexible. Simple modules should not be overloaded with boilerplate and complex modules should not be unimplementable and degrade into spaghetti.
I’m going to illustrate some examples from simple to complex, introducing one or two unique aspects of this architecture at a time. We’ll start with four view controller examples then move on to coordinators.
View controller
Basic template
All of our view controllers will have the shape of the code below. We’ll add more as the complexity of this module increases.
import UIKit
import ReactiveSwift
import enum Result.NoError

final class ViewController: UIViewController {
    enum Inputs {
    }

    enum Outputs {
    }

    private let inputSignal: Signal<Inputs, NoError>
    let inputObserver: Observer<Inputs, NoError>

    let outputSignal: Signal<Outputs, NoError>
    private let outputObserver: Observer<Outputs, NoError>

    init() {
        (inputSignal, inputObserver) = Signal<Inputs, NoError>.pipe()
        (outputSignal, outputObserver) = Signal<Outputs, NoError>.pipe()

        super.init()
    }
}
The first thing to note is each view controller specifically declares what dynamic inputs it accepts and what dynamic outputs it provides to the outside world. The template view controller above is completely static with no input or output cases. Because these enums are nested within the view controller, they can always be named Inputs and Outputs.
Next, we have a Signal/Observer pair for inputs and one for outputs. The private/internal distinctions are intentional: the outside world can send inputs (of type Inputs) on inputObserver and can observe outputs (of type Outputs) on outputSignal.
As stated in the type signature (NoError), these signals can’t error. They are also not intended to complete before the view controller has deallocated, but we’ll have to take some additional steps to guarantee that behavior.
One button, one output
Now, let’s say we have a view controller with one static button that says “start”.

final class StartViewController: UIViewController {
    enum Inputs { }
    enum Outputs {
        case tappedStart
    }

    private let inputSignal: Signal<Inputs, NoError>
    let inputObserver: Observer<Inputs, NoError>

    let outputSignal: Signal<Outputs, NoError>
    private let outputObserver: Observer<Outputs, NoError>

    init() {
        (inputSignal, inputObserver) = Signal<Inputs, NoError>.pipe()
        (outputSignal, outputObserver) = Signal<Outputs, NoError>.pipe()

        super.init(nibName: nil, bundle: nil)
    }

    override func viewDidLoad() {
        super.viewDidLoad()

        let button = UIButton(type: .roundedRect)
        button.setTitle("Start", for: [.normal])
        button.addTarget(self, action: #selector(doStart), for: .touchUpInside)
        view.addSubview(button)
    }

    func doStart() {
        outputObserver.send(value: .tappedStart)
    }
}
A few small changes:
- We’ve added a new output case
tappedStart. - We’ve added a button with a standard target/selector.
- We’re sending
Outputs.tappedStartto the privateoutputObserveron each button tap.
The outside world can subscribe to outputSignal on this view controller and respond to the single event type tappedStart.
For now, I’m going to continue using the grammar
tapfor view controller outputs (sending them “as is” so to speak) and allowing subscribers translate the meaning. In the future, I’ll probably revisit this decision.
Static input, two buttons, two outputs
Let’s try something more useful. Now the view controller will accept a static list of pizza toppings, and broadcast the ones the user chose or allow the user to cancel.

typealias PizzaTopping = String

final class SelectToppingsViewController: UITableViewController {
    enum Inputs { }
    enum Outputs {
        case tapCancel
        case selectToppings([PizzaTopping])
    }

    private let inputSignal: Signal<Inputs, NoError>
    let inputObserver: Observer<Inputs, NoError>

    let outputSignal: Signal<Outputs, NoError>
    private let outputObserver: Observer<Outputs, NoError>

    let toppings: [PizzaTopping]

    init(toppings: [PizzaTopping]) {

        self.toppings = toppings

        (inputSignal, inputObserver) = Signal<Inputs, NoError>.pipe()
        (outputSignal, outputObserver) = Signal<Outputs, NoError>.pipe()

        super.init(nibName: nil, bundle: nil)
    }

    override func viewDidLoad() {
        super.viewDidLoad()

        navigationItem.leftBarButtonItem = UIBarButtonItem(title: "Cancel", style: .plain, target: self, action: #selector(doCancel))
        navigationItem.rightBarButtonItem = UIBarButtonItem(title: "Next", style: .plain, target: self, action: #selector(doNext))

        tableView.register(UITableViewCell.self, forCellReuseIdentifier: String(describing: UITableViewCell.self))
        tableView.delegate = self
        tableView.dataSource = self
        tableView.allowsMultipleSelection = true
    }

    func doCancel() {
        outputObserver.send(value: .tapCancel)
    }

    func doNext() {
        let selectedToppings = tableView.indexPathsForSelectedRows?.map { toppings[$0.row] } ?? []
        outputObserver.send(value: .selectToppings(selectedToppings))
    }

    override func tableView(_ tableView: UITableView, numberOfRowsInSection section: Int) -> Int {
        return toppings.count
    }

    override func tableView(_ tableView: UITableView, cellForRowAt indexPath: IndexPath) -> UITableViewCell {
        let cell = tableView.dequeueReusableCell(withIdentifier: String(describing: UITableViewCell.self), for: indexPath)
        cell.textLabel?.text = toppings[indexPath.row]
        return cell
    }
}
We’ve added a table view with multiple selection as well as two bar button items. Since our input is static (i.e. the input will not change for the entire lifetime of the view controller), we don’t have to declare it as a part of our signal Inputs.
Notice we’re sending an associated value [PizzaToppings]. Another important note is that view controllers should only communicate to the outside world through immutable data structures.
The public API surface of this subclass is:
init(toppings: [PizzaTopping])outputSignal: Signal<Outputs, NoError>
Cells with multiple buttons
Let’s see how this pattern extends deeper into the view hierarchy by introducing reusable cells with inner buttons.
This example isn’t strictly necessary to understand the coordinator section, so feel free to skip it.
This time we have a view controller that shows a static table of n tweets, each with a share button and a save button. The outputs available to external classes are tapSave(Tweet) and tapShare(Tweet).

Note: I’ve included only the code necessary to illustrate this technique.
struct Tweet {
    let id: String
    let text: String
}

final class TweetViewModel {
    enum Outputs {
        case tapSave(Tweet)
        case tapShare(Tweet)
    }

    let outputSignal: Signal<Outputs, NoError>
    private let outputObserver: Observer<Outputs, NoError>

    let tweet: Tweet
    let text: String

    init(tweet: Tweet) {
        (outputSignal, outputObserver) = Signal<Outputs, NoError>.pipe()
        self.tweet = tweet
        self.text = tweet.text
    }

    func doTapSave() {
        outputObserver.send(value: .tapSave(tweet))
    }

    func doTapShare() {
        outputObserver.send(value: .tapShare(tweet))
    }
}

final class TweetCell: UITableViewCell {
    private let label = UILabel()
    private let saveButton = UIButton(type: .system)
    private let shareButton = UIButton(type: .system)

    var viewModel: TweetViewModel? {
        didSet {
            label.text = viewModel?.text
        }
    }

    override init(style: UITableViewCellStyle, reuseIdentifier: String?) {

        super.init(style: style, reuseIdentifier: reuseIdentifier)

        shareButton.addTarget(self, action: #selector(doTapSave), for: .touchUpInside)
        shareButton.addTarget(self, action: #selector(doTapShare), for: .touchUpInside)
    }

    func doTapSave() {
        viewModel?.doTapSave()
    }

    func doTapShare() {
        viewModel?.doTapShare()
    }
}

final class TweetsViewController: UITableViewController {
    enum Outputs {
        case tapSave(Tweet)
        case tapShare(Tweet)
    }

    let outputSignal: Signal<Outputs, NoError>
    private let outputObserver: Observer<Outputs, NoError>

    private let (outputBusSignal, outputBusObserver) = Signal<Signal<Outputs, NoError>, NoError>.pipe()

    let viewModels: [TweetViewModel]

    init(tweets: [Tweet]) {
        (outputSignal, outputObserver) = Signal<Outputs, NoError>.pipe()

        outputBusSignal.flatten(.merge).observe(outputObserver)

        self.viewModels = tweets.map({ [unowned outputBusObserver] (tweet: Tweet) -> TweetViewModel in
            let tweetViewModel = TweetViewModel(tweet: tweet)
            outputBusObserver.send(value: tweetViewModel.outputSignal.map(TweetsViewController.mapIO))
            return tweetViewModel
        })

        super.init(nibName: nil, bundle: nil)
    }

    override func tableView(_ tableView: UITableView, cellForRowAt indexPath: IndexPath) -> UITableViewCell {
        let cell = tableView.dequeueReusableCell(withIdentifier: String(describing: TweetCell.self), for: indexPath) as! TweetCell
        cell.viewModel = viewModels[indexPath.row]
        return cell
    }

    private static func mapIO(output: TweetViewModel.Outputs) -> TweetsViewController.Outputs {
        switch output {
        case .tapSave(let tweet): return .tapSave(tweet)
        case .tapShare(let tweet): return .tapShare(tweet)
        }
    }
}
I chose to use a dedicated view model for each tweet. It’s possible to use this technique without a view model, but the reuse semantics are a bit different.
You’ll notice TweetViewModel has a output signal/observer set. When a view model is assigned to a visible cell, a button tap on that cell will be transformed into a tapShare or tapSave enum value on the view model’s output signal.
In order to capture those values, we created another signal/observer pair called outputBusSignal/outputBusObserver. outputBusSignal is a signal of signals whose values are merged into our standard outputSignal.
You might be wondering, why do we need a bus? Instead of:
outputBusObserver.send(value: vm.outputSignal.map(mapIO))
Why can’t we just do:
viewModel.outputSignal.map(mapIO).observe(outputObserver)
The reason is safety. As the consumer of the view model, we can’t guarantee that viewModel.outputSignal won’t send a .completed ReactiveSwift event. If it does, the .completed event will propagate through and terminate all the downstream signals and no further events can be processed by the system. (This problem could be solved by a specialized reactive framework signal that 1. only sends values and 2. stays alive only as long as it is retained by its owner.)
Therefore another cardinal rule of this architecture while using a value/error/completed reactive framework is never connect signals directly together.
Moving on. You’ll also notice the static function mapIO that transforms the child’s Outputs type to the parent’s Outputs type.
static func mapIO(output: TweetViewModel.Outputs) -> TweetsViewController.Outputs
In this architecture, you’ll see this function defined on its own very often for the sake of explicitness. In general, this architecture focuses on wiring input and output signals together in various ways, transforming the inner values. I’ve standardized the name as mapIO. Conveniently, in case your class has to map different output types you can use the same function name. You’ll see more examples in the upcoming coordinators section.
Additional complexity
I know I haven’t illustrated more complex cases like using the Inputs signal of the view controller. At the moment, I have an vague idea of how I’d want to use the Inputs signal instead of passing in data providers or view models to the view controller. For now though, I’d like to move on to the coordinators to see how we can actually use the standardized Outputs signal of multiple view controllers to manage our view controller hierarchy from above.
Hopefully, through these examples you’re getting a feel for what we’re trying to accomplish. We’ve created a strict grammar for communication with view layer classes in our architecture (analogous to a protocol) and provided an extension point for coordinators.
Coordinator
I’ll first outline the general shape of a coordinator in this architecture. Then I’ll show implementations of three common view controller paradigms in iOS: modal presentation/dismissing, navigation pushing/popping, and selection by tabs.
Basic template
struct Coordinator {
    static func vend() -> ViewController {
        let viewController = ViewController()
        return viewController
    }
}
Coordinators in this architecture are structurally quite simple. A coordinator is a container for static functions, the most important being the vend function.
Because vend is a static function, it needs to take in any dependencies required to initialize its view controller. vend will always return a UIViewController subclass.
Aside: why not make
Coordinatora protocol?vend’s arguments vary on the type of view controller being created. The type of view controller being returned needs to be knowable by the calling class so that its input and output signals can be properly utilized.
Because coordinators are simply recipes for creating view controllers and wiring together signals, we don’t need to worry about creating a whole sidecar system that simultaneously owns and takes orders from UIKit. (A lot of the motivation behind this architecture was getting tired of fighting UIKit, but still wanting to improve MVC). View controllers still follow their lifetime semantics when they’re attached to windows and presented by other view controllers. There’s no double referencing or external monitoring of UIKit’s inner workings required. This also means we could add this architecture to an existing architecture simply by vending a new view controller from a coordinator into the existing code.
How we go about working within the UIKit system will be illustrated in the examples to come.
Presenting
The most simple case is a view controller that wants to present an error. UIAlertController handles its own dismissal so at this point we won’t worry about handling output from a presented view controller.

(Note: I’ve omitted some code in the sample below).
final class MainViewController: UIViewController {
    enum Outputs {
        case error(NSError)
    }
}

struct AlertCoordinator {
    static func vend(error: NSError) -> UIAlertController {
        let alertController = UIAlertController(title: "Error", message: error.localizedDescription, preferredStyle: .alert)
        alertController.addAction(UIAlertAction(title: "OK", style: UIAlertActionStyle.default, handler: nil))
        return alertController
    }
}

struct MainCoordinator {
    static func vend() -> MainViewController {
        let mainViewController = MainViewController()

        mainViewController.outputSignal
            .observe(on: UIScheduler())
            .observeValues { [unowned mainViewController] (output: MainViewController.Outputs) in
                switch output {
                case .error(let error):
                    let alertController = AlertCoordinator.vend(error: error)
                    mainViewController.present(alertController, animated: true, completion: nil)
                }
            }

        return mainViewController
    }
}
The AlertCoordinator is as simple as the template. It configures a view controller (in this case, pretty trivially) and returns it. Whether this work can be inlined into the caller depends on how complex the set up is, how often these kinds of view controllers will be created, and your discretion.
In MainCoordinator, in addition to creating a MainViewController, we’re attaching an ad-hoc observer to its outputSignal. We’ll ensure the observe block is executed on the UI thread because we can’t guarantee outputSignal will always return values on the UI thread.
We have to create a unowned capture block for mainViewController, otherwise it will create a retain cycle.
We switch on all output types. In this case there’s only one. Personally, I like exhaustive enums and if a view controller added an output type, I would want to ensure it was handled in the coordinator or intentionally discarded.
The caller of MainCoordinator (and receiver of MainViewController) could be the our app delegate or a completely separate module of the app.
Because MainViewController is returned directly from the vend function, that also means the caller has the ability to attach any number of observers to the public MainViewController.outputSignal. This functionality may be useful, but you’ll see in the coming examples that navigating in this fashion is relatively rare in data driven apps.
The lifetime of the observe block we created is tied directly to MainViewController.outputSignal which will be destroyed alongside MainViewController. MainCoordinator itself is stateless.
Navigation stack
I find that in data driven apps, view controllers are almost always in a navigation stack, and similarly are presenting other navigation stacks. Therefore, I created a helper UINavigationController subclass for use in coordinators. Let’s take a look at the template for what I call IONavigationController.
final class IONavigationController<InputType, OutputType>: UINavigationController {
    let inputSignal: Signal<InputType, NoError>
    let inputObserver: Observer<InputType, NoError>
    let outputSignal: Signal<OutputType, NoError>
    let outputObserver: Observer<OutputType, NoError>

    private let inputBusSignal: Signal<Signal<InputType, NoError>, NoError>
    let inputBusObserver: Observer<Signal<InputType, NoError>, NoError>
    private let outputBusSignal: Signal<Signal<OutputType, NoError>, NoError>
    let outputBusObserver: Observer<Signal<OutputType, NoError>, NoError>

    override init(nibName nibNameOrNil: String?, bundle nibBundleOrNil: Bundle?) {
        (inputSignal, inputObserver) = Signal<InputType, NoError>.pipe()
        (outputSignal, outputObserver) = Signal<OutputType, NoError>.pipe()
        (inputBusSignal, inputBusObserver) = Signal<Signal<InputType, NoError>, NoError>.pipe()
        (outputBusSignal, outputBusObserver) = Signal<Signal<OutputType, NoError>, NoError>.pipe()

        inputBusSignal.flatten(.merge).observe(inputObserver)
        outputBusSignal.flatten(.merge).observe(outputObserver)

        super.init(nibName: nibNameOrNil, bundle: nibBundleOrNil)
    }
}
The purpose of IONavigationController will be more clear in the coming examples. For now, notice that the input/output signal structure looks similar to our view controllers, except the input and output types are specified by the instantiating coordinator and the basic signal pairs are public.
Presenting and dismissing
Let’s imagine we have an app with a main view controller and a settings view controller, each within a navigation stack. The main view controller presents a settings view controller modally. The settings view controller can be dismissed, but no model data is transferred between the two.

I’ll split the code up this time, showing the SettingsCoordinator components on their own first. (Note: I’ve omitted some code for clarity.)
final class SettingsViewController: UIViewController {
    enum Outputs {
        case tapDone
    }
}

struct SettingsCoordinator {
    enum Inputs { }
    enum Outputs {
        case done
    }

    static func vend() -> IONavigationController<Inputs, Outputs> {
        let settingsViewController = SettingsViewController()
        let navigationController = IONavigationController<Inputs, Outputs>(rootViewController: mainViewController)

        navigationController.outputBusObserver.send(value: settingsViewController.outputSignal.map(mapIO))

        return navigationController
    }

    static func mapIO(output: SettingsViewController.Outputs) -> SettingsCoordinator.Outputs {
        switch output {
        case .tapDone: return .done
        }
    }
}
The IONavigationController is essentially a wrapper for SettingsViewController in this case. This architecture makes it pretty straightforward to forward signals alongside a quick map.
As previously mentioned in the view controllers section, we’re placing settingsViewController’s mapped outputSignal on an outputBusObserver instead of connecting it directly to maintain safety. We shouldn’t assume settingsViewController.outputSignal will never complete.
// Unsafe
settingsViewController.outputSignal.map(mapIO).observe(navigationController.outputObserver)

// Safe
navigationController.outputBusObserver.send(value: settingsViewController.outputSignal.map(mapIO))
Now callers of SettingsCoordinator can interact with the returned IONavigationController like they do with any other view controller by observing its outputs.
I almost always follow the rule that view controllers should not dismiss themselves, even though UIKit is pretty lax with allowing this behavior (and allowing any view controller to walk the parent/child chain up and down). The reason being that the view controller shouldn’t be aware of its presentation context. That’s why this coordinator returns done instead of just dismissing itself.
At the moment, I haven’t figured out a way to obscure the concrete
IONavigationControllerbehind a protocol when it’s returned from a coordinator’svendfunction. Therefore all its public signals and observers are available down the stack, even though they shouldn’t be.
Now let’s look at the MainCoordinator which will be responsible for presenting and dismissing the result of SettingsCoordinator.
final class MainViewController: UIViewController {
    enum Outputs {
        case tapSettings
    }
}

struct MainCoordinator {
    enum Inputs {
        presentSettings
        dismissChild
    }
    enum Outputs { }

    static func vend() -> IONavigationController<Inputs, Outputs> {
        let mainViewController = MainViewController()
        let navigationController = IONavigationController<Inputs, Outputs>(rootViewController: mainViewController)

        navigationController.inputBusObserver.send(value: mainViewController.outputSignal.map(mapIO))

        navigationController.inputSignal
            .observe(on: UIScheduler())
            .observeValues { [unowned navigationController] (input: MainCoordinator.Inputs) in
                switch input {
                case .presentSettings:
                    let settingsNavigationController = SettingsCoordinator.vend()
                    navigationController.inputBusObserver.send(value: settingsNavigationController.outputObserver.map(mapIO))
                    navigationController.present(settingsNavigationController, animated: true, completion: nil)
                case .dismissChild:
                    navigationController.dismiss(animated: true, completion: nil)
                }
            }

        return navigationController
    }

    static func mapIO(output: MainViewController.Outputs) -> MainCoordinator.Inputs {
        switch output {
        case .tapSettings: return .presentSettings
        }
    }

    static func mapIO(output: SettingsCoordinator.Outputs) -> MainCoordinator.Inputs {
        switch output {
        case .done: return .dismissChild
        }
    }
}
We’re going to use a new technique since this coordinator is a bit more complicated. We’re going to map all side-effecting actions to specific coordinator Inputs and map and pipe all output signals from view controllers into inputObserver/inputSignal. We’ll declare all the action/data pairs that this coordinator can process as Inputs.
I’m not 100% sold on whether marking internal actions as
Inputsis a sustainable idea. In theory they shouldn’t necessarily be exposed asInputs. There should be another internal signal type that handles the primary data processing flows for the coordinator.
As the rootViewController, mainViewController doesn’t need to be initialized within the inputSignal processing chain. mainViewController.outputSignal will be mapped and connected to the IONavigationController’s inputBusObserver. We’ve seen this pattern a few times already.
Moving into the observe block, we’ll find two cases we need to cover. In general, the code within each case should only be about 3 lines long max like shown in presentSettings.
- Vend a new view controller.
- Connect outputs to inputs.
- Present the view controller.
For side effects with no output:
- Create a
SignalProducer. - Start the
SignalProducerand discard the output.
For side effects with output:
- Create a
SignalProducer. - Start the
SignalProducer. - Wire the
SignalProducer’s resultingSignalto the navigation controller’s input bus.
Pushing and popping
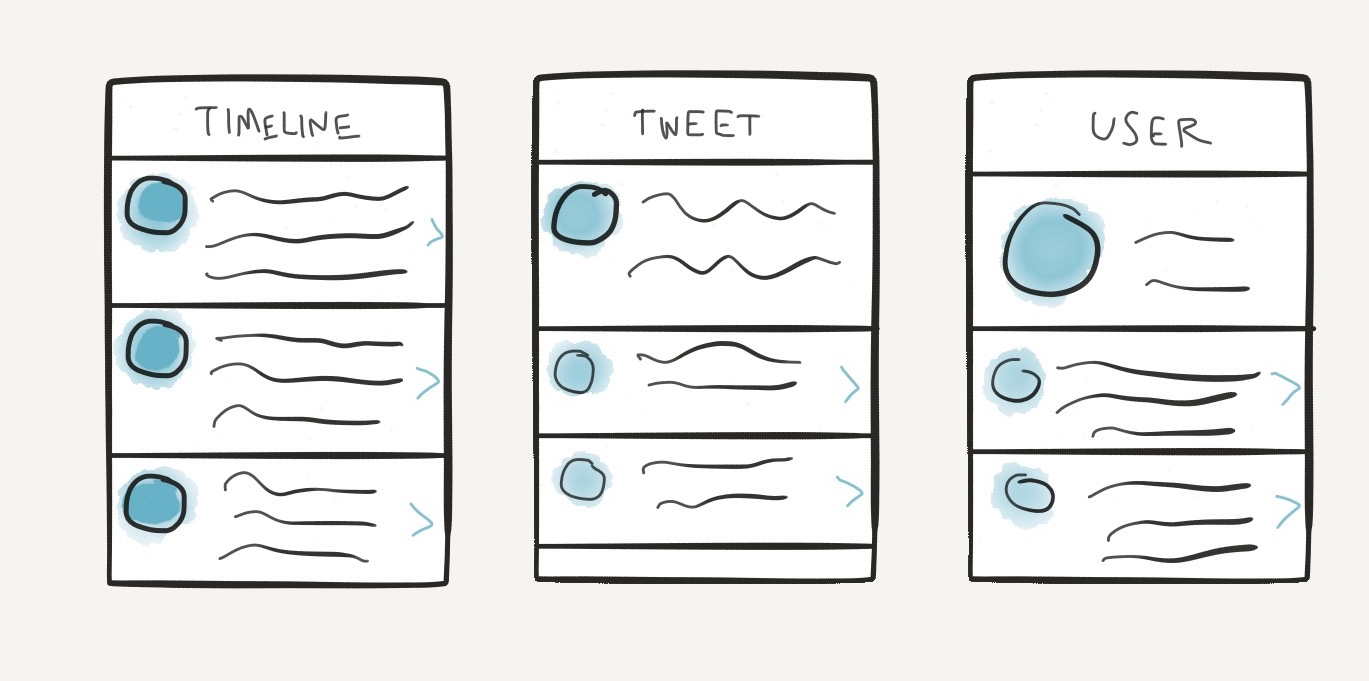
To demonstrate pushing and popping with a navigation controller, let’s look at an “infinite pushing” interface with a simplified version of Twitter.
In this version we have a root view controller that shows tweets on your timeline. From here, you can tap on any tweet or user to view to push the tweet detail view controller or user view controller, respectively. From the user view controller you can view any of that user’s tweets in a detail view. From the tweet detail view controller you can view the details of any other tweet in the replies, view any user profile listed in the replies, or perform a secret gesture to pop back to your timeline.
(Note: some structural code has been omitted for clarity. Data fetching code has also been omitted.)
struct Tweet { }
struct User { }

final class TweetsViewController: UIViewController {
    enum Outputs {
        case tapTweet(Tweet)
        case tapUser(User)
    }
}

final class TweetDetailViewController: UIViewController {
    enum Outputs {
        case tapTweet(Tweet)
        case tapUser(User)
        case secretPopInitiated
    }
}

final class UserViewController: UIViewController {
    enum Outputs {
        case tapTweet(Tweet)
    }
}

struct TimelineCoordinator {
    enum Inputs {
        case presentTweetDetail(Tweet)
        case presentUser(User)
        case popToRoot
    }
    enum Outputs { }

    static func vend() -> IONavigationController<Inputs, Outputs> {
        let tweetsViewController = TweetsViewController()
        let navigationController = IONavigationController<Inputs, Outputs>(rootViewController: tweetsViewController)

        navigationController.inputBusObserver.send(value: tweetsViewController.outputSignal.map(mapIO))

        navigationController.inputSignal
            .observe(on: UIScheduler())
            .observeValues { [unowned navigationController] (input: TimelineCoordinator.Inputs) in
                switch input {
                case .presentTweetDetail(let tweet):
                    let tweetDetailViewController = TweetDetailViewController()
                    navigationController.inputBusObserver.send(value: tweetDetailViewController.outputObserver.map(mapIO))
                    navigationController.pushViewController(tweetDetailViewController, animated: true)
                case .presentUser(let user):
                    let userViewController = UserViewController()
                    navigationController.inputBusObserver.send(value: userViewController.outputObserver.map(mapIO))
                    navigationController.pushViewController(userViewController, animated: true)
                case .popToRoot:
                    navigationController.popToRootViewController(animated: true)
                }
            }

        return navigationController
    }

    static func mapIO(output: TweetsViewController.Outputs) -> TimelineCoordinator.Inputs {
        switch output {
        case .tapTweet(let tweet): return .presentTweetDetail(tweet)
        case .tapUser(let user): return .presentUser(user)
        }
    }

    static func mapIO(output: TweetDetailViewController.Outputs) -> TimelineCoordinator.Inputs {
        switch output {
        case .tapTweet(let tweet): return .presentTweetDetail(tweet)
        case .tapUser(let user): return .presentUser(user)
        case .secretPopInitiated: return .popToRoot
        }
    }

    static func mapIO(output: UserViewController.Outputs) -> TimelineCoordinator.Inputs {
        switch output {
        case .tapTweet(let tweet): return .presentTweetDetail(tweet)
        }
    }
}
UIKit will handle the standard back behavior automatically for us.
Besides that, this code follows the same patterns as before.
TabBar interface
If none of the view controllers contained by the tab bar view controller pass data or otherwise need to interact, our tab bar coordinator is as straightforward as it usually is with UIKit.

struct MainTabBarCoordinator {
    enum Inputs { }
    enum Outputs { }

    static func vend() -> UITabBarController {
        let tabBarController = UITabBarController()

        let timelineNavigationController = TimelineCoordinator.vend()
        let notificationsNavigationController = NotificationsCoordinator.vend()
        let profileNavigationController = ProfileCoordinator.vend()

        let viewControllers = [timelineNavigationController, notificationsNavigationController, profileNavigationController]

        tabBarController.setViewControllers(viewControllers, animated: false)

        return tabBarController
    }
}
Each of the navigation controllers vended by the coordinators will handle its own stack transparently.
In the more complicated (and usual) case that our child view controllers have outputs, we should use a UITabBarController subclass identical to the UINavigationController subclass IONavigationController shown previously in this post. The layout of the coordinator will look similar to the NavigationCoordinators also presented previously. The primary differences will be that all the view controllers will be created up front (and not in response to another view controller’s output), and all view controller output signals can be wired up at the same time.
Code example wrap up
We looked at a fair amount of code.
First, we looked at view controllers in the context of this architecture pattern.
The standard pattern for view controllers is:
- Declare an enum of
InputsandOutputs. - Declare a public input observer and a public output signal to accept and transmit dynamic events during the view controller’s lifecycle.
- Accept static dependencies in the initializer.
Next, we looked at stateless coordinators in the context of this architecture pattern.
The standard pattern for coordinators is:
- Identify as a struct with no state or static methods.
- Declare an enum of
InputsandOutputsif necessary. - Declare a static function called
vendthat returns aUIViewControllersubclass. - Accept static dependencies necessary for creating child view controllers in the initializer for
vend. - Declare pure transformation functions between child view controller outputs and coordinator inputs.
- Dynamically attach child view controller outputs to coordinator inputs.
- Perform navigation related side effects or other side effects.
I left out a few relevant code examples for this post. One example I’d like to tackle in the future is using a navigation controller as a “builder” of intermediate steps. The navigation patterns presented above can’t carry state between intermediate steps without passing all information to each step.
Unique attributes
This architecture has few unique attributes.
Input/Output enum for specifying boundaries
Enums are one of my favorite features of Swift. I like the exactness of being able to specify “this data can only be one of the these n types” and knowing the compiler will tell me if I’ve forgotten any.
I understand that enums can be a sign of brittleness or tight coupling. However, in the context of this architecture, I consider enums to be a useful building block.
Signals as the facilitators of state
There are plenty of posts about the positives of reactive programming. I’ll mention the clean concurrency model, multi-observer support, and composability.
Embracing using signal/observer pairs directly
In this architecture, I’ve embraced the imperativeness of UIKit. Using signal/observer pairs blurs the line between reactive and imperative, and is usually seen as a bad thing in the reactive world. In this architecture, I wanted to see if I could supplement UIKit with the most basic building blocks of reactive frameworks.
Open questions
Stateful navigation flows
As mentioned above, I haven’t yet developed a pattern for implementing stateful navigation flows, specifically collecting and combining data from multiple view controllers to produce one output. I need to spend some time considering ways to implement this.
UIKit as just another framework
As opposed to Soroush’s coordinator implementation, this architecture still lets UIKit run the show with regards to object lifetimes. I’d like to explore the implications of this in more settings. Are there cases where I’m reliant on UIKit lifetime events in a way that’s detrimental to the user experience? Are there other cases where wrestling control away from UIKit provides additional benefits that I’m not thinking of at the moment?
More than just navigation
I’ve intentionally ignored the architecture of data flows beyond saying “data sources can be provided via dependency injection”. In the practice of using this architecture so far I’ve used a few different architectures, the most common being a more looser form of MVVM. I’m still creating a view model for each view controller, but that view model is more or less a helper class of the view controller and the view controller is responsible for communicating with the rest of the app.
I’d like to explore using the Inputs signal as the only conduit for dynamic communication into a view controller. Does that increase or decrease complexity? Do view controller lifetime events clutter up the communication channels? Does stricter separation push too much responsibility into the coordinator?
What about having both the view controller and the view model have input and output signals and having the coordinator tie them together?
A specialized reactive framework?
Using ReactiveSwift for the plumbing of this architecture provides the benefits of interoperability with the rest of the app and usage of the many built in tools maintained so diligently by the community. However, this architecture has the very specific requirement of:
- Signal lifetime directly tied to its owner (no termination events).
- 0 or more values sent.
- No errors.
It’s certainly not worth investing time in creating a new framework at this point (although I technically started exploring something similar last year). But at some point it would be interesting to see if the code would be any cleaner and if interoperability could be achieved.
Don’t use IONavigationController (UINavigationController subclass)
It’s convenient to use configure an IONavigationController from coordinators, but perhaps it would make more sense to create special purpose UINavigationController subclasses for each coordinator (that also might solve the stateless navigation problem mentioned above).
Is it really worth it not to use delegation?
Is using an Outputs enum and a signal really any better than using a protocol and assigning a delegate? I’d like to find more direct comparisons between the two approaches.
All around naming
Should view controllers interpret meaning in their events before sending them? Should we keep using UI focused prefixes like “tap” in the Outputs cases? Should the enums be called Input/Output or Inputs/Outputs?
Should these coordinators be called something else?
How about IONavigationController’s Inputs? Should there be another private enum and signal?
Blocks instead of signals?
Would it be possible to replace inputSignal/outputSignal with an optional inputBlock?/outputBlock?? If we’re not using the multi-observer functionality, it could decrease complexity. It would definitely change the all-around syntax of the architecture.
Conclusion
I’ve proposed an architecture for controlling application flow in a UIKit-based iOS app using stateless coordinators.
I’m going to continue working on this architecture in an app (that I may eventually open source) and see if any new patterns emerge. I want to treat this post as a checkpoint and clarify my thinking.
Thanks for reading, and please let me know your thoughts and suggestions. I’m @twocentstudios on Twitter.